FnOS - 飞牛NAS
正常使用ISO安装,注意系统还没发布正式版,暂时不要将其作为存储的底层设施,目前应还保持使用TrueNAS以提高稳定性,通过NFS共享至FnOS后使用FnOS即可(除相册功能无法使用挂载盘外应该都可以)。
相册使用远程挂载文件夹
核心思想是通过判断NFS文件夹是否就绪以及应用程序文件夹是否就绪,如果未就绪就持续等待
创建一个Systemd服务(/etc/systemd/system/auto_mount_photos.service):
[Unit]
Description=Mount photos folder when system ready

[Service]
Type=oneshot
ExecStart=/bin/bash -c "while [ ! -d /vol02/1000-4-aca1d432/Photos ]; do echo Waiting...; sleep 5; done; while [ ! -d /vol1/1000/Photos ]; do sleep 1; done; mount --bind /vol02/1000-4-aca1d432/Photos /vol1/1000/Photos"


[Install]
WantedBy=multi-user.target这里注意一下,mount前面的是远程挂载路径,后面的是在飞牛NAS中创建的挂载点;这样飞牛NAS就可以使用NFS挂载的远程目录了:

核显直通后noVNC连接失败
添加的显卡设备不要设为GPU即可。
PVE内扩容
首先在PVE内把磁盘动态调整空间增量一些。
然后在FnOS里SSH进入Root,首先创建一个分区:
root@fnOS:~# fdisk /dev/sda

Welcome to fdisk (util-linux 2.38.1).
Changes will remain in memory only, until you decide to write them.
Be careful before using the write command.

This disk is currently in use - repartitioning is probably a bad idea.
It's recommended to umount all file systems, and swapoff all swap
partitions on this disk.


Command (m for help): p

Disk /dev/sda: 50 GiB, 53687091200 bytes, 104857600 sectors
Disk model: QEMU HARDDISK
Units: sectors of 1 * 512 = 512 bytes
Sector size (logical/physical): 512 bytes / 512 bytes
I/O size (minimum/optimal): 512 bytes / 512 bytes
Disklabel type: dos
Disk identifier: 0xd70332fe

Device     Boot    Start      End  Sectors  Size Id Type
/dev/sda1           2048   194559   192512   94M 83 Linux
/dev/sda2         194560 20971519 20776960  9.9G 83 Linux
/dev/sda3       20971520 33554431 12582912    6G 83 Linux

Command (m for help): n
Partition type
   p   primary (3 primary, 0 extended, 1 free)
   e   extended (container for logical partitions)
Select (default e): p

Selected partition 4
First sector (33554432-104857599, default 33554432):
Last sector, +/-sectors or +/-size{K,M,G,T,P} (33554432-104857599, default 104857599):

Created a new partition 4 of type 'Linux' and of size 34 GiB.

Command (m for help): w
The partition table has been altered.
Syncing disks.
再看磁盘:
root@fnOS:~# fdisk -l
Disk /dev/sda: 50 GiB, 53687091200 bytes, 104857600 sectors
Disk model: QEMU HARDDISK
Units: sectors of 1 * 512 = 512 bytes
Sector size (logical/physical): 512 bytes / 512 bytes
I/O size (minimum/optimal): 512 bytes / 512 bytes
Disklabel type: dos
Disk identifier: 0xd70332fe

Device     Boot    Start       End  Sectors  Size Id Type
/dev/sda1           2048    194559   192512   94M 83 Linux
/dev/sda2         194560  20971519 20776960  9.9G 83 Linux
/dev/sda3       20971520  33554431 12582912    6G 83 Linux
/dev/sda4       33554432 104857599 71303168   34G 83 Linux


Disk /dev/md0: 6 GiB, 6437208064 bytes, 12572672 sectors
Units: sectors of 1 * 512 = 512 bytes
Sector size (logical/physical): 512 bytes / 512 bytes
I/O size (minimum/optimal): 512 bytes / 512 bytes


Disk /dev/mapper/trim_0ad31aa9_affd_4cbd_ba22_7945b9c2c2e7-0: 5.99 GiB, 6434062336 bytes, 12566528 sectors
Units: sectors of 1 * 512 = 512 bytes
Sector size (logical/physical): 512 bytes / 512 bytes
I/O size (minimum/optimal): 512 bytes / 512 bytes然后创建一个卷并扩展到/dev/mapper/trim...上:
root@fnOS:~# vgextend trim_0ad31aa9_affd_4cbd_ba22_7945b9c2c2e7 /dev/sda4
  Volume group "trim_0ad31aa9_affd_4cbd_ba22_7945b9c2c2e7" successfully extended
root@fnOS:~# vgs
  VG                                        #PV #LV #SN Attr   VSize   VFree
  trim_0ad31aa9_affd_4cbd_ba22_7945b9c2c2e7   2   1   0 wz--n- <39.99g <34.00g
root@fnOS:~# lvextend -l +100%FREE /dev/mapper/trim_0ad31aa9_affd_4cbd_ba22_7945b9c2c2e7-0
  Size of logical volume trim_0ad31aa9_affd_4cbd_ba22_7945b9c2c2e7/0 changed from 5.99 GiB (1534 extents) to <39.99 GiB (10237 extents).
  Logical volume trim_0ad31aa9_affd_4cbd_ba22_7945b9c2c2e7/0 successfully resized.
root@fnOS:~# btrfs filesystem resize max /vol1
Resize device id 1 (/dev/mapper/trim_0ad31aa9_affd_4cbd_ba22_7945b9c2c2e7-0) from 5.99GiB to max
至此扩容完成。
迅雷
正常安装即可。
核显驱动
如果选择直通则应该直接就能驱动,如果选择核显虚拟化,那么需要参考飞牛启用虚拟显卡
影视无法播放
在一次更新后,飞牛影视在应用权限中添加的外部挂载文件夹统一被设为了禁止访问:
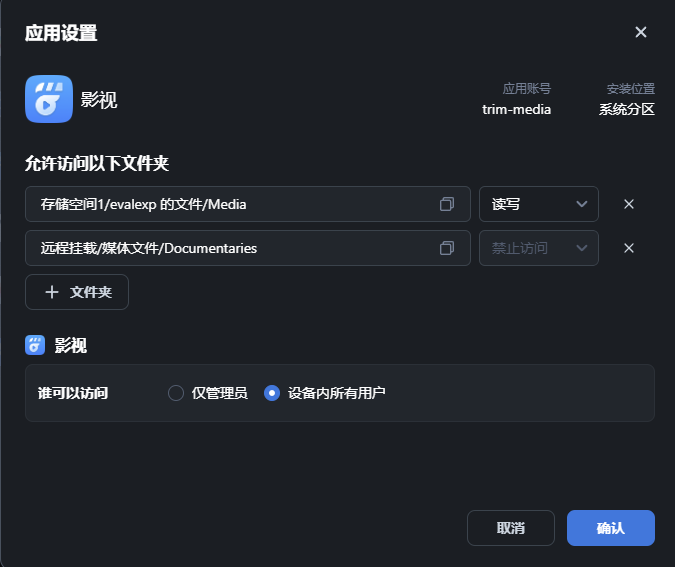
这使得该应用访问我们的媒体文件时,会被拒绝访问,从而导致相关媒体文件播放失败;同时我们可以看到在这里还是灰色的无法修改的,这使得我们的影视App无法正确的使用远程挂载。
解决办法其实和相册使用远程挂载文件夹这一节差不多,我们创建一个服务,来将其绑定到一个本地文件夹,这样就可以绕过这里的权限设置了,创建服务文件(/etc/systemd/system/auto_mount_media.service):
[Unit]
Description=Mount media folder when system ready

[Service]
Type=oneshot
ExecStart=/bin/bash -c "while [ ! -d /vol02/1000-4-921bdeee/Documentaries ] || [ ! -d /vol02/1000-4-921bdeee/Movies ] || [ ! -d /vol02/1000-4-921bdeee/Series ]; do echo Waiting...; sleep 5; done; while [ ! -d /vol1/1000/Media/Documentaries ] || [ ! -d /vol1/1000/Media/Movies ] || [ ! -d /vol1/1000/Media/Series ] ; do sleep 1; done; mount --bind /vol02/1000-4-921bdeee/Documentaries /vol1/1000/Media/Documentaries; mount --bind /vol02/1000-4-921bdeee/Movies /vol1/1000/Media/Movies; mount --bind /vol02/1000-4-921bdeee/Series /vol1/1000/Media/Series; "


[Install]
WantedBy=multi-user.target
然后自启该服务,同时修改权限,使影视访问我们绑定的文件夹,修改ƒ一些媒体库的路径即可。
FFMPEG无法更新
可能会遇到这样的问题:
Preparing to unpack .../ffmpeg_7%3a5.1.9-0+deb12u1_amd64.deb ...
Unpacking ffmpeg (7:5.1.9-0+deb12u1) over (7:5.1.8-0+deb12u1) ...
dpkg: error processing archive /var/cache/apt/archives/ffmpeg_7%3a5.1.9-0+deb12u1_amd64.deb (--unpack):
 trying to overwrite '/usr/bin/ffmpeg', which is also in package trim 1.1.3107
Errors were encountered while processing:
 /var/cache/apt/archives/ffmpeg_7%3a5.1.9-0+deb12u1_amd64.deb
E: Sub-process /usr/bin/dpkg returned an error code (1)
这是因为trim包中已经包含了ffmpeg,无法覆盖二进制文件,所以需要我们手动处理一下,将trim包中的ffmpeg和ffprobe都重命名一下:
sudo dpkg-divert --package ffmpeg --add --rename --divert /usr/bin/ffprobe.trim /usr/bin/ffprobe
sudo dpkg-divert --package ffmpeg --add --rename --divert /usr/bin/ffmpeg.trim /usr/bin/ffmpeg
添加上述的diversion规则即可成功更新。
如果需要恢复,则必须先卸载ffmpeg,然后再删除规则:
sudo apt purge ffmpeg

sudo dpkg-divert --package ffmpeg --remove --rename /usr/bin/ffmpeg
sudo dpkg-divert --package ffmpeg --remove --rename /usr/bin/ffprobe