FnOS - 飞牛NAS
正常使用ISO安装,注意系统还没发布正式版,暂时不要将其作为存储的底层设施,目前应还保持使用TrueNAS以提高稳定性,通过NFS共享至FnOS后使用FnOS即可(除相册功能无法使用挂载盘外应该都可以)。
Nginx Proxy Manager【Deprecated】
注意app-net是外部网络,自己创建一下。
docker network create app-net
Compose文件如下:
services:
  app:
    image: 'jc21/nginx-proxy-manager:latest'
    restart: always
    ports:
      - '80:80'
      - '81:81'
      - '443:443'
    networks:
      - app-net
    volumes:
      - ./data:/data
      - ./letsencrypt:/etc/letsencrypt

networks:
  app-net:
    external: true
Homarr【Deprecated】
Compose文件如下:
#---------------------------------------------------------------------#
#     Homarr - A simple, yet powerful dashboard for your server.      #
#---------------------------------------------------------------------#
services:
  homarr:
    container_name: homarr
    image: ghcr.io/ajnart/homarr:latest
    restart: always
    volumes:
      - ./homarr/configs:/app/data/configs
      - ./homarr/icons:/app/public/icons
      - ./homarr/data:/data
    #ports:
    #  - '7575:7575'
    networks:
      - app-net

networks:
  app-net:
    external: true
Sun-Panel
services:
  sun-panel:
    image: "hslr/sun-panel:latest"
    container_name: sun-panel
    volumes:
      - ./conf:/app/conf
      - /var/run/docker.sock:/var/run/docker.sock # 挂载docker.sock
      # - ./runtime:/app/runtime # 挂载日志目录
      # - /mnt/sata1-1:/os # 硬盘挂载点(根据自己需求修改)
    # ports:
    #   - 3002:3002
    restart: always
    networks:
     - app-net
    labels:
      - "traefik.enable=true"
      - "traefik.http.routers.sun-panel.rule=Host(`nav.evalexp.top`) || Host(`nav`) || Host(`nav.home.net`)"
      - "traefik.http.routers.sun-panel.service=sun-panel"
      - "traefik.http.services.sun-panel.loadbalancer.server.port=3002"
      - "traefik.http.routers.sun-panel.entrypoints=https"
      - "traefik.http.routers.sun-panel.tls=true"

networks:
  app-net:
   external: true
Tailscale
提前去官网生成好key。 由于使用IPv6进行P2P,这里直接选择使用host网络。
考虑到FnOS的稳定性欠佳,目前已迁移至专属容器;不在FnOS中启用。
Compose文件如下:
services:
  tailscale:
    image: ghcr.io/tailscale/tailscale:latest
    container_name: tailscale
    volumes:
      - ./data:/var/lib/tailscale
    restart: always
    network_mode: host
    environment:
      - TS_HOSTNAME=subnet-router
      - TS_STATE_DIR=/var/lib/tailscale
      - TS_AUTHKEY=tskey-auth-???
      - TS_ROUTES=192.168.31.0/24
相册使用远程挂载文件夹
核心思想是通过判断NFS文件夹是否就绪以及应用程序文件夹是否就绪,如果未就绪就持续等待
创建一个Systemd服务(/etc/systemd/system/auto_mount_photos.service):
[Unit]
Description=Mount photos folder when system ready

[Service]
Type=oneshot
ExecStart=/bin/bash -c "while [ ! -d /vol02/1000-4-473c10f4/Photos ]; do echo Waiting...; sleep 5; done; while [ ! -d /vol1/1000/Photos ]; do sleep 1; done; mount --bind /vol02/1000-4-473c10f4/Photos /vol1/1000/Photos"


[Install]
WantedBy=multi-user.target这里注意一下,mount前面的是远程挂载路径,后面的是在飞牛NAS中创建的挂载点;这样飞牛NAS就可以使用NFS挂载的远程目录了:

核显直通后noVNC连接失败
添加的显卡设备不要设为GPU即可。
PVE内扩容
首先在PVE内把磁盘动态调整空间增量一些。
然后在FnOS里SSH进入Root,首先创建一个分区:
root@fnOS:~# fdisk /dev/sda

Welcome to fdisk (util-linux 2.38.1).
Changes will remain in memory only, until you decide to write them.
Be careful before using the write command.

This disk is currently in use - repartitioning is probably a bad idea.
It's recommended to umount all file systems, and swapoff all swap
partitions on this disk.


Command (m for help): p

Disk /dev/sda: 50 GiB, 53687091200 bytes, 104857600 sectors
Disk model: QEMU HARDDISK
Units: sectors of 1 * 512 = 512 bytes
Sector size (logical/physical): 512 bytes / 512 bytes
I/O size (minimum/optimal): 512 bytes / 512 bytes
Disklabel type: dos
Disk identifier: 0xd70332fe

Device     Boot    Start      End  Sectors  Size Id Type
/dev/sda1           2048   194559   192512   94M 83 Linux
/dev/sda2         194560 20971519 20776960  9.9G 83 Linux
/dev/sda3       20971520 33554431 12582912    6G 83 Linux

Command (m for help): n
Partition type
   p   primary (3 primary, 0 extended, 1 free)
   e   extended (container for logical partitions)
Select (default e): p

Selected partition 4
First sector (33554432-104857599, default 33554432):
Last sector, +/-sectors or +/-size{K,M,G,T,P} (33554432-104857599, default 104857599):

Created a new partition 4 of type 'Linux' and of size 34 GiB.

Command (m for help): w
The partition table has been altered.
Syncing disks.
再看磁盘:
root@fnOS:~# fdisk -l
Disk /dev/sda: 50 GiB, 53687091200 bytes, 104857600 sectors
Disk model: QEMU HARDDISK
Units: sectors of 1 * 512 = 512 bytes
Sector size (logical/physical): 512 bytes / 512 bytes
I/O size (minimum/optimal): 512 bytes / 512 bytes
Disklabel type: dos
Disk identifier: 0xd70332fe

Device     Boot    Start       End  Sectors  Size Id Type
/dev/sda1           2048    194559   192512   94M 83 Linux
/dev/sda2         194560  20971519 20776960  9.9G 83 Linux
/dev/sda3       20971520  33554431 12582912    6G 83 Linux
/dev/sda4       33554432 104857599 71303168   34G 83 Linux


Disk /dev/md0: 6 GiB, 6437208064 bytes, 12572672 sectors
Units: sectors of 1 * 512 = 512 bytes
Sector size (logical/physical): 512 bytes / 512 bytes
I/O size (minimum/optimal): 512 bytes / 512 bytes


Disk /dev/mapper/trim_0ad31aa9_affd_4cbd_ba22_7945b9c2c2e7-0: 5.99 GiB, 6434062336 bytes, 12566528 sectors
Units: sectors of 1 * 512 = 512 bytes
Sector size (logical/physical): 512 bytes / 512 bytes
I/O size (minimum/optimal): 512 bytes / 512 bytes然后创建一个卷并扩展到/dev/mapper/trim...上:
root@fnOS:~# vgextend trim_0ad31aa9_affd_4cbd_ba22_7945b9c2c2e7 /dev/sda4
  Volume group "trim_0ad31aa9_affd_4cbd_ba22_7945b9c2c2e7" successfully extended
root@fnOS:~# vgs
  VG                                        #PV #LV #SN Attr   VSize   VFree
  trim_0ad31aa9_affd_4cbd_ba22_7945b9c2c2e7   2   1   0 wz--n- <39.99g <34.00g
root@fnOS:~# lvextend -l +100%FREE /dev/mapper/trim_0ad31aa9_affd_4cbd_ba22_7945b9c2c2e7-0
  Size of logical volume trim_0ad31aa9_affd_4cbd_ba22_7945b9c2c2e7/0 changed from 5.99 GiB (1534 extents) to <39.99 GiB (10237 extents).
  Logical volume trim_0ad31aa9_affd_4cbd_ba22_7945b9c2c2e7/0 successfully resized.
root@fnOS:~# btrfs filesystem resize max /vol1
Resize device id 1 (/dev/mapper/trim_0ad31aa9_affd_4cbd_ba22_7945b9c2c2e7-0) from 5.99GiB to max
至此扩容完成。
Navidrome
实际上这里每次开机都会失败,表现为整个NAS重启后必然启动失败、仅重启FnOS则正常:
services:
  navidrome:
    image: deluan/navidrome:latest
    user: 1000:1000 # should be owner of volumes
    restart: always
    networks:
      - app-net
    environment:
      ND_SCANSCHEDULE: 24h
    volumes:
      - "./data:/data"
      - "/vol02/1000-4-59eec9e0/Music:/music:ro"
    labels:
      - "traefik.enable=true"
      - "traefik.http.routers.navidrom.rule=Host(`music.fnos.evalexp.top`) || Host(`music`) || Host(`music.home.net`)"
      - "traefik.http.routers.navidrom.service=navidrom"
      - "traefik.http.services.navidrom.loadbalancer.server.port=4533"
      - "traefik.http.routers.navidrom.entrypoints=https"
      - "traefik.http.routers.navidrom.tls=true"

networks:
  app-net:
   external: true
解决方案为添加一个Systemd服务检测挂载的NFS文件夹是否已经就绪,然后重启该容器:
[Unit]
Description=Wait for music dir ready and restart navidrome

[Service]
Type=oneshot
ExecStart=/bin/bash -c "while [ ! -d '/vol02/1000-4-59eec9e0/Music' ] || [ ! -f '/vol1/1000/App/@appcenter/navidrome/docker-compose.yml' ]; do echo 'Waiting for Music directory or docker-compose.yml...'; sleep 5; done; docker compose -f '/vol1/1000/App/@appcenter/navidrome/docker-compose.yml' restart"

[Install]
WantedBy=multi-user.target
Home Assistant
用虚拟机装会好一点,但是不想增加虚拟机的管理工作,所以这里我还是用Docker了。
直接用配置文件启动了,使用FNOS的镜像:
services:
  homeassistant:
    container_name: homeassistant
    image: "registry.fnnas.com/fnapp/homeassistant_home-assistant"
    volumes:
      - ./config:/config
      - /etc/localtime:/etc/localtime:ro
      - /run/dbus:/run/dbus:ro
    restart: always
    privileged: true
    networks:
     - app-net

networks:
  app-net:
   external: true
然后正常安装使用。
迅雷
先正常在应用商店中安装,然后会自动创建docker项目,此时修改配置文件:
version: '3.8'
services:
  xunlei:
    image: cnk3x/xunlei
    container_name: xunlei
    restart: unless-stopped
    privileged: true
    environment:
      UID: ${TRIM_UID}
      GID: ${TRIM_GID}
      XL_DASHBOARD_USERNAME: ${wizard_username}
      XL_DASHBOARD_PASSWORD: ${wizard_password}
    volumes:
      - /var/apps/docker-xunlei/target/data:/xunlei/data
      - /var/apps/docker-xunlei/shares/xunlei/downloads:/xunlei/downloads
    #ports:
    #  - "2345:2345"
    networks:
      - trim-default
      - app-net
    labels:
      - "traefik.enable=true"
      - "traefik.http.routers.xunlei.rule=Host(`xunlei.fnos.evalexp.top`) || Host(`xunlei`) || Host(`xunlei.home.net`)"
      - "traefik.http.routers.xunlei.service=xunlei"
      - "traefik.http.services.xunlei.loadbalancer.server.port=2345"
      - "traefik.http.routers.xunlei.entrypoints=https"
      - "traefik.http.routers.xunlei.tls=true"
      - "traefik.http.routers.xunlei.middlewares=xunlei-auth"
      - "traefik.http.middlewares.xunlei-auth.basicauth.users=evalexp:$$2y$$10$$ilfxMWW/qRAJ94CfeZzxfeuu8QDlphXgf8EOe3jZsc6ZbX0N0XkNu"

networks:
  trim-default:
    external: true

  app-net:
   external: true
注意添加一个app-net的外部网络,然后附加到这个网络,并且注释掉端口映射。
Gitea
配置SSH直通
首先需要参考Gitea SSH直通的文章;我们需要先创建一个git用户并且知道其uid和gid:
evalexp@FnOS:~$ id git

uid=1001(git) gid=1002(git) groups=1002(git)
接下来我们先以git用户来创建一个公私密钥:
sudo -u git ssh-keygen -t rsa -b 4096 -C "Gitea Host Key"完成后在/home/git/.ssh/下应该会有id_rsa和id_rsa.pub,接下来将公钥写入到authorized_keys:
echo "$(cat /home/git/.ssh/id_rsa.pub)" >> /home/git/.ssh/authorized_keys然后创建一个/usr/local/bin/gitea文件,向其中写入一下内容:
ssh -p 50022 -o StrictHostKeyChecking=no git@127.0.0.1 "SSH_ORIGINAL_COMMAND=\"$SSH_ORIGINAL_COMMAND\" $0 $@"完成后注意需要添加执行权限。
请注意,这里使用了50022端口作为Gitea的ssh映射端口。
到这里基本上就配置好了SSH直通的配置了。
配置Gitea容器
接下来启动Gitea:
services:
  gitea:
    container_name: gitea
    image: "docker.gitea.com/gitea:1.23.7"
    volumes:
      - ./gitea:/data
      - /etc/timezone:/etc/timezone:ro
      - /etc/localtime:/etc/localtime:ro
      - /home/git/.ssh:/data/git/.ssh
    restart: always
    environment:
      - USER_UID=1001
      - USER_GID=1002
      - APP_NAME=Gitea
      - DOMAIN=gitea.evalexp.top
      - SSH_DOMAIN=gitea.evalexp.top
      - SSH_PORT=22

    networks:
      - app-net
    ports:
      - "127.0.0.1:50022:22"
    labels:
      - "traefik.enable=true"
      - "traefik.http.routers.gitea.rule=Host(`gitea.evalexp.top`) || Host(`gitea`) || Host(`gitea.home.net`)"
      - "traefik.http.routers.gitea.service=gitea"
      - "traefik.http.services.gitea.loadbalancer.server.port=3000"
      - "traefik.http.routers.gitea.entrypoints=https"
      - "traefik.http.routers.gitea.tls=true"

networks:
  app-net:
external: true请注意,这里的USER_UID和USER_GID务必和前面的git用户的uid和gid对应。
配置Runner
LXC配置
考虑到Runner可能需求的性能比较大,从此步开始,不要在FnOS中启动容器了。
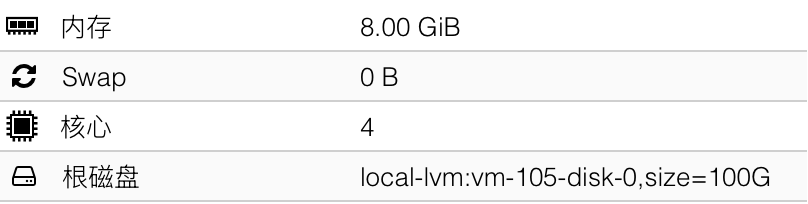
首先到PVE中创建一个LXC容器,选择Alpine镜像并且勾选嵌套即可;我这里分配了4C8G + 100GSSD的配置:
由于Runner本身就使用了Docker,这里我们也采用Docker来部署Runner;首先参考Alpine的文章,安装好Docker并设置开机启动。
向/etc/sysctl.conf中写入内容:
net.ipv6.conf.all.disable_ipv6=1
net.ipv6.conf.default.disable_ipv6=1
net.ipv6.conf.lo.disable_ipv6=1然后启用sysctl服务:
rc-update add sysctl default接下来配置Runner容器。
Runner配置
然后创建一下Runner配置:
docker run --entrypoint="" --rm -it docker.io/gitea/act_runner:latest act_runner generate-config > config.yaml然后编辑文件,配置缓存相关:
cache:
  # Enable cache server to use actions/cache.
  enabled: true
  # The directory to store the cache data.
  # If it's empty, the cache data will be stored in $HOME/.cache/actcache.
  dir: ""
  # The host of the cache server.
  # It's not for the address to listen, but the address to connect from job containers.
  # So 0.0.0.0 is a bad choice, leave it empty to detect automatically.
  host: "192.168.31.51"
  # The port of the cache server.
  # 0 means to use a random available port.
  port: 8088
  # The external cache server URL. Valid only when enable is true.
  # If it's specified, act_runner will use this URL as the ACTIONS_CACHE_URL rather than start a server by itself.
  # The URL should generally end with "/".
  external_server: ""
注意这里的host填入当前LXC的地址;8088用于后面的Docker映射端口。
再到Gitea的管理后台中,在Actions下的Runner,右上角有个创建Runner,复制这里的Registration Token;然后填入下面的配置:
services:
  runner:
    image: gitea/act_runner
    environment:
      CONFIG_FILE: /config.yaml
      GITEA_INSTANCE_URL: "${INSTANCE_URL}"
      GITEA_RUNNER_REGISTRATION_TOKEN: "${REGISTRATION_TOKEN}"
      GITEA_RUNNER_NAME: "${RUNNER_NAME}"
      GITEA_RUNNER_LABELS: "${RUNNER_LABELS}"
    ports:
      - 8088:8088
    volumes:
      - ./config.yaml:/config.yaml
      - ./data:/data
      - /var/run/docker.sock:/var/run/docker.sock
可供参考的配置:
services:
  runner:
    image: gitea/act_runner
    environment:
      CONFIG_FILE: /config.yaml
      GITEA_INSTANCE_URL: "https://gitea.evalexp.top"
      GITEA_RUNNER_REGISTRATION_TOKEN: "${REGISTRATION_TOKEN}"
      GITEA_RUNNER_NAME: "Runner-Node-1"
      GITEA_RUNNER_LABELS: ""
    ports:
      - 8088:8088
    volumes:
      - ./config.yaml:/config.yaml
      - ./data:/data
      - /var/run/docker.sock:/var/run/docker.sock
启动,然后应该就能在Gitea中查看到对应的Runner了。