包管理器Scoop
安装scoop
启用Powershell脚本执行权限
Set-ExecutionPolicy RemoteSigned -scope CurrentUser自定义安装目录
若不自定义目录,scoop将默认安装至用户目录。
在Administrator权限下执行:
$env:SCOOP='D:\Scoop'
[Environment]::SetEnvironmentVariable('SCOOP', $env:SCOOP, 'User')
$env:SCOOP_GLOBAL='D:\Scoop_Global'
[Environment]::SetEnvironmentVariable('SCOOP_GLOBAL', $env:SCOOP_GLOBAL, 'Machine')
注意修改目录即可。
若不使用环境变量定义,则可使用参数传递方式。
执行安装脚本
需要使用代理,或者通过命令行传递代理地址
对于定义过安装目录的,可以直接通过:
iwr -useb get.scoop.sh | iex若只有管理员权限,则使用:
iex "& {$(irm get.scoop.sh)} -RunAsAdmin"若没有定义环境变量或希望通过命令行传递代理地址,则:
irm get.scoop.sh -outfile 'install.ps1'
.\install.ps1 -ScoopDir 'Scoop_Path' -ScoopGlobalDir 'GlobalScoop_Path' -Proxy 'http://<ip:port>'
上述操作通过下载安装脚本,后执行安装脚本实现。
使用代理下载
在Powershell中设置代理:
$env:HTTPS_PROXY="http://127.0.0.1:7890"
# By the way, if some software official website do not support HTTPS, need to set HTTP_PROXY
$env:HTTP_PROXY="http://127.0.0.1:7890"
# For the binary program which could detect ALL_PROXY, you could set
$env:ALL_PROXY="http://127.0.0.1:7890"
下载Arm64版软件
如果一个软件提供了Arm64版本,但是Scoop安装时还是自动安装的x64,则可以手动添加,以JDK为例:
{
    "description": "BellSoft Liberica is a 100% open-source Java implementation",
    "homepage": "https://bell-sw.com/java",
    "version": "21.0.5-11",
    "license": "GPL-2.0-only WITH Classpath-exception-2.0",
    "architecture": {
        "64bit": {
            "url": "https://github.com/bell-sw/Liberica/releases/download/21.0.5%2B11/bellsoft-jdk21.0.5%2B11-windows-amd64-full.zip",
            "hash": "sha1:4b1a668ce0139e744c1adeec1b1066e10f76b638"
        },
        "32bit": {
            "url": "https://github.com/bell-sw/Liberica/releases/download/21.0.5%2B11/bellsoft-jdk21.0.5%2B11-windows-i586-full.zip",
            "hash": "sha1:6fc2fbd5ecdfaedf4bcac06dc3ad688a910dc320"
        },
        "arm64": {
            "url": "https://download.bell-sw.com/java/21.0.5+11/bellsoft-jdk21.0.5+11-windows-aarch64-full.zip",
            "hash": "sha1:8d91aeb04f6bcb7d7f394b0b5fc1cf77e9870cfe"
        }
    },
    "extract_dir": "jdk-21.0.5-full",
    "env_add_path": "bin",
    "env_set": {
        "JAVA_HOME": "$dir"
    },
    "checkver": {
        "url": "https://api.bell-sw.com/v1/liberica/releases?bundle-type=jdk-full&version-modifier=latest&release-type=lts&os=windows&arch=x86&installation-type=archive&package-type=zip&output=json&fields=version",
        "jsonpath": "$.version",
        "regex": "(?<major>[\\d.]+)(?:\\+)(?<build>[\\d]+)",
        "replace": "${major}-${build}"
    },
    "autoupdate": {
        "architecture": {
            "64bit": {
                "url": "https://github.com/bell-sw/Liberica/releases/download/$matchMajor%2B$matchBuild/bellsoft-jdk$matchMajor%2B$matchBuild-windows-amd64-full.zip"
            },
            "32bit": {
                "url": "https://github.com/bell-sw/Liberica/releases/download/$matchMajor%2B$matchBuild/bellsoft-jdk$matchMajor%2B$matchBuild-windows-i586-full.zip"
            }
        },
        "hash": {
            "url": "https://api.bell-sw.com/v1/liberica/releases/$basename",
            "jsonpath": "$.sha1"
        },
        "extract_dir": "jdk-$matchMajor-full"
    }
}添加一个arm64的architecture就好了。
软件使用
nssm
此软件可以将程序包装成为Windows的服务,使之保持运行。
编辑服务
通过命令行:
nssm install可以唤出nssm的服务编辑页面:
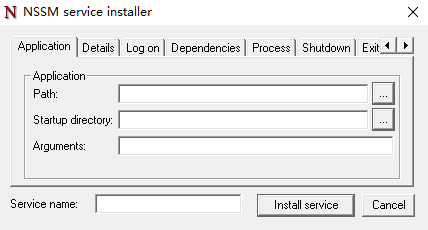 在此处对应编辑即可安装对应服务。
rclone开启挂载实例
通过nssm编辑rclone挂载,在编辑完命令行参数后,调整Startup Type为Automatic (Delayed Start);由于nssm无法指定恢复操作,需要自行打开服务管理器,将恢复选项卡中的第一次失败和第二次失败设置为重新启动服务,如图:
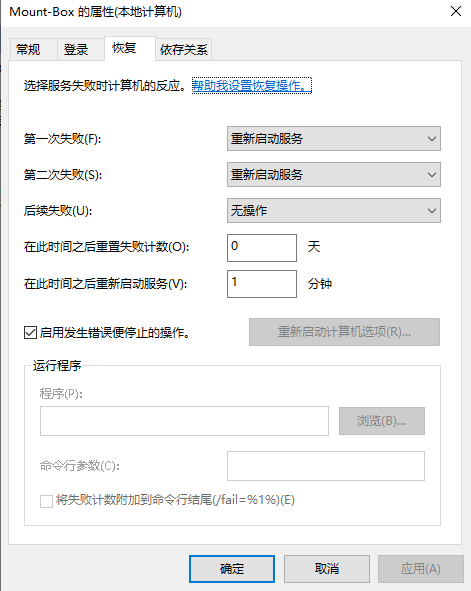
这是由于WinFSP可能出现问题导致服务异常退出,设置后可以重新启动两次,保证挂载生效。
rclone
此软件可以将网络存储映射为本地磁盘驱动器,rclone具体用法不在此处说明。 示例1:
rclone mount TeraCloud:/ X: --cache-dir G:\rclone\Cache\ --vfs-cache-mode writes这会映射TeraCloud配置到X驱动器,若配置无法获取准确的空间大小,则可以通过指定vfs的size:
rclone mount TeraCloud:/ X: --cache-dir G:\rclone\Cache\ --vfs-cache-mode writes --vfs-disk-space-total-size 15G
--vfs-cache-mode有一个full选项,不推荐使用,若使用该选项,则无法获取更新后的内容。
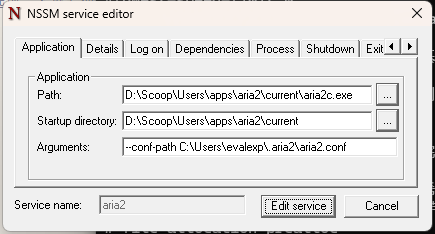
aria2
配置可以直接参考Aria2,改一下下载的路径就好了;然后配置NSSM如下:

Windows下的Aria2感觉速度奇慢,不如使用IDM
注册表
取消移动硬盘显示两次
将注册表计算机\HKEY_LOCAL_MACHINE\SOFTWARE\Microsoft\Windows\CurrentVersion\Explorer\Desktop\NameSpace\DelegateFolders中的{F5FB2C77-0E2F-4A16-A381-3E560C68BC83}选项重命名成-{F5FB2C77-0E2F-4A16-A381-3E560C68BC83},显示改回去就行。
网络驱动器无法在程序中显示
在注册表:计算机\HKEY_LOCAL_MACHINE\SOFTWARE\Microsoft\Windows\CurrentVersion\Policies\System,添加一个DWORD(32位)的值,名字为:EnableLinkedConnections,值为1.
Onedrive在资源管理器无法展开
注册表添加以下:
Windows Registry Editor Version 5.00

[HKEY_LOCAL_MACHINE\SOFTWARE\Microsoft\Windows\CurrentVersion\Explorer\FolderDescriptions\{A52BBA46-E9E1-435f-B3D9-28DAA648C0F6}]
"Attributes"=dword:00000001
"Category"=dword:00000004
"DefinitionFlags"=dword:00000040
"Icon"=hex(2):25,00,53,00,79,00,73,00,74,00,65,00,6d,00,52,00,6f,00,6f,00,74,\
00,25,00,5c,00,73,00,79,00,73,00,74,00,65,00,6d,00,33,00,32,00,5c,00,69,00,\
6d,00,61,00,67,00,65,00,72,00,65,00,73,00,2e,00,64,00,6c,00,6c,00,2c,00,2d,\
00,31,00,30,00,34,00,30,00,00,00
"LocalRedirectOnly"=dword:00000001
"Name"="OneDrive"
"ParentFolder"="{5E6C858F-0E22-4760-9AFE-EA3317B67173}"
"ParsingName"="shell:::{018D5C66-4533-4307-9B53-224DE2ED1FE6}"
"RelativePath"="OneDrive"
保存为Reg文件后运行即可。
Powershell & Dotnet
将Dotnet输出设置为英文
在Powershell中执行:
$env:DOTNET_CLI_UI_LANGUAGE="en_US"或直接设置环境变量DOTNET_CLI_UI_LANGUAGE为en_US即可。
如果在Powershell中发布模块失败,请执行上述操作
禁用虚拟化安全
保存为bat,管理员执行:
@echo offpushd"%~dp0"dir /bC:\Windows\servicing\Packages\Microsoft-Windows-GroupPolicy-ClientExtensions-Package~3*.mum>List.txtdir /bC:\Windows\servicing\Packages\Microsoft-Windows-GroupPolicy-ClientTools-Package~3*.mum>>List.txtfor /f i"pause:然后去组策略禁用DeviceGuard(系统⇒Device Guard),将此文件解压
然后运行:
DG_Readiness.ps1 -Disable 随后重启。
上面的办法会自动重新开启,还是需要直接修改引导参数。
(1) 修改 Windows Bootloader 引导参数关闭
bcdedit /set hypervisorlaunchtype off
(2)修改注册表相关参数来关闭,如
HKEY_LOCAL_MACHINE\SYSTEM\CurrentControlSet\Control\DeviceGuard
将值改为0 “EnableVirtualizationBasedSecurity”=dword:00000000
(3) 修改Windows 安全中心,设备安全性,内核隔离,关闭内存完整性.
(4) 修改组策略,将设备保护,基于虚拟化的安全性设置为禁用.
输入法
导入小鹤双拼,注册表:
Windows Registry Editor Version 5.00

[HKEY_CURRENT_USER\SOFTWARE\Microsoft\InputMethod\Settings\CHS]
"EnableExtraDomainType"=dword:00000001
"Enable Double Pinyin"=dword:00000001
"DoublePinyinScheme"=dword:0000000a
"UserDefinedDoublePinyinScheme0"="小鹤双拼*2*^*iuvdjhcwfg^xmlnpbksqszxkrltvyovt"
注意需要保存为ANSI编码,否则在系统设置里会显示乱码;如果不需要默认启用双拼,将
Enable Double Pinyin改为0即可。
Windows Terminal
oh-my-posh
安装Powershell Core后使用oh-my-posh自定义主题:
{
    "$schema": "https://raw.githubusercontent.com/JanDeDobbeleer/oh-my-posh/main/themes/schema.json",
    "final_space": true,
    "version": 2,
    "blocks": [
        {
            "type": "prompt",
            "alignment": "left",
            "segments": [
                {
                    "foreground": "#f55858",
                    "style": "plain",
                    "template": "{{if .Root }}@root{{end}}",
                    "type": "session"
                },
                {
                    "foreground": "#6BFF90",
                    "style": "plain",
                    "template": "{{if not .Root }}@{{ .UserName }}{{end}} on ",
                    "type": "session"
                },
                {
                    "foreground": "#57e3ff",
                    "style": "plain",
                    "template": "{{ .PWD }}",
                    "type": "path"
                },
                {
                    "foreground": "#14A5AE",
                    "powerline_symbol": "\ue0b0",
                    "properties": {
                        "fetch_stash_count": true,
                        "fetch_upstream_icon": true
                    },
                    "style": "plain",
                    "template": " {{ .UpstreamIcon }}{{ .HEAD }}{{ if gt .StashCount 0 }} \ueb4b {{ .StashCount }}{{ end }} ",
                    "type": "git"
                }
            ]
        },
        {
            "newline": true,
            "type": "prompt",
            "alignment": "left",
            "segments": [
                {
                    "foreground": "#03f72c",
                    "style": "plain",
                    "template": "{{ if eq .Code 0 }}\u279c{{ end }}",
                    "type": "text"
                },
                {
                    "foreground": "#ff0044",
                    "style": "plain",
                    "template": "{{ if ne .Code 0 }}\u279c{{ end }}",
                    "type": "text"
                }
            ]
        }
    ]
}可将该文件存储于任意位置,建议存储到Scoop的persist目录下,没有则自己创建一个,随后在$PROFILE中加入下面这行:
D:\Scoop\Applications\apps\oh-my-posh\current\oh-my-posh.exe init pwsh --config D:\Scoop\Applications\persist\oh-my-posh\custom.omp.json | Invoke-Expression注意替换一下自己的oh-my-posh路径以及主题路径;依赖字体库Meslo-NF,需要添加nerd-fonts的bucket。
Win 11 LTSC 激活
Win11 LTSC KMS 【Deprecated】
废弃,参考下面的KMS激活,使用NAS的内网激活即可。
管理员执行:
slmgr -ipk M7XTQ-FN8P6-TTKYV-9D4CC-J462D
slmgr -skms kms.0t.net.cn
slmgr -ato
KMS激活
对内网的机器,无需再使用任何工具激活了,只要下载VL版本都会默认自带一个VL的密钥,使用KMS激活即可。
ImmortalWRT里搜索安装luci-app-vlmcsd-zh-cn,同时安装语言包。
服务会自动启动,不用修改什么参数,启动后即可。
激活Windows
slmgr.vbs -skms 192.168.31.2
slmgr.vbs -ato
// 检查激活状态
slmgr.vbs -xpr
等待片刻提示激活成功即可。
激活Office
首先Office必须是VOL版本的,否则无法激活;找到Office的安装目录,一般为C:\Program Files\Microsoft Office\Office16,或者在Program Files (x86)下面,Office后面的数字就是对应的版本了;找到该目录下的OSPP.VBS就说明位置没错了。
cd C:\Program Files\Microsoft Office\Office16
cscript ospp.vbs /sethst:192.168.31.2
cscript ospp.vbs /inpkey:XJ2XN-FW8RK-P4HMP-DKDBV-GCVGB
cscript ospp.vbs /act
// 检查激活状态
cscript ospp.vbs /dstatus
注意改VOL的Key,如果自带Key的就忽略inpkey的步骤
Office VOL Key
Office 2024:XJ2XN-FW8RK-P4HMP-DKDBV-GCVGB
彻底禁用Windows更新
- services.msc:服务禁用Windows Update,并且修改该服务的恢复,第一次失败改为不操作
- gpedit.msc:组策略中,计算机配置→管理模板→Windows组件→Windows更新→配置自动更新改为已禁用;同样在Windows更新下,删除使用所有Windows更新功能的访问权限改为已启用
- taskschd.msc:计划任务中,任务计划程序库 → Microsoft → Windows → WindowsUpdate,禁用该任务中的所有计划任务
- regedit:位置:HKEY_LOCAL_MACHINE\SYSTEM\CurrentControlSet\Services\UsoSvc,键Start改为4;FailureActions将0010以及0018开始的第5个数值01改为00
当提示无权限时,可以通过PsExec去执行,命令如下:
PsExec64.exe -i -s C:\Windows\System32\mmc.exe /s taskschd.msc