PVE 8
正常安装PVE8,面板密码为安装系统设置的密码,用户为
root
修改源
主要参考这篇文章:Proxmox 源使用帮助 — USTC Mirror Help 文档
Debian及Proxmox源
通过SSH链接到PVE,随后依次执行:
sed -i 's|^deb http://ftp.debian.org|deb https://mirrors.ustc.edu.cn|g' /etc/apt/sources.list
sed -i 's|^deb http://security.debian.org|deb https://mirrors.ustc.edu.cn/debian-security|g' /etc/apt/sources.list
source /etc/os-release
echo "deb https://mirrors.ustc.edu.cn/proxmox/debian/pve $VERSION_CODENAME pve-no-subscription" > /etc/apt/sources.list.d/pve-no-subscription.list
Ceph源
如果需要使用到Ceph,则使用下面的语句修改源:
if [ -f /etc/apt/sources.list.d/ceph.list ]; then CEPH_CODENAME=`ceph -v | grep ceph | awk '{print $(NF-1)}'`; source /etc/os-release; echo "deb https://mirrors.ustc.edu.cn/proxmox/debian/ceph-$CEPH_CODENAME $VERSION_CODENAME no-subscription" > /etc/apt/sources.list.d/ceph.list; fi若不需要,则禁用该源,将/etc/apt/sources.list.d/ceph.list的源注释,如下:
# deb https://enterprise.proxmox.com/debian/ceph-quincy bookworm enterpriseCT Templates源
如果要使用到LXC的容器功能,这个必不能少
还是SSH链接到PVE,执行:
cp /usr/share/perl5/PVE/APLInfo.pm /usr/share/perl5/PVE/APLInfo.pm_back
sed -i 's|http://download.proxmox.com|https://mirrors.ustc.edu.cn/proxmox|g' /usr/share/perl5/PVE/APLInfo.pm
禁用企业更新源
修改文件/etc/apt/sources.list.d/pve-enterprise.list,将该源注释,如下:
# deb https://enterprise.proxmox.com/debian/pve bookworm pve-enterprise去除无效订阅弹窗
通过修改后端返回的方式防止弹窗,直接改前端应该也可以:
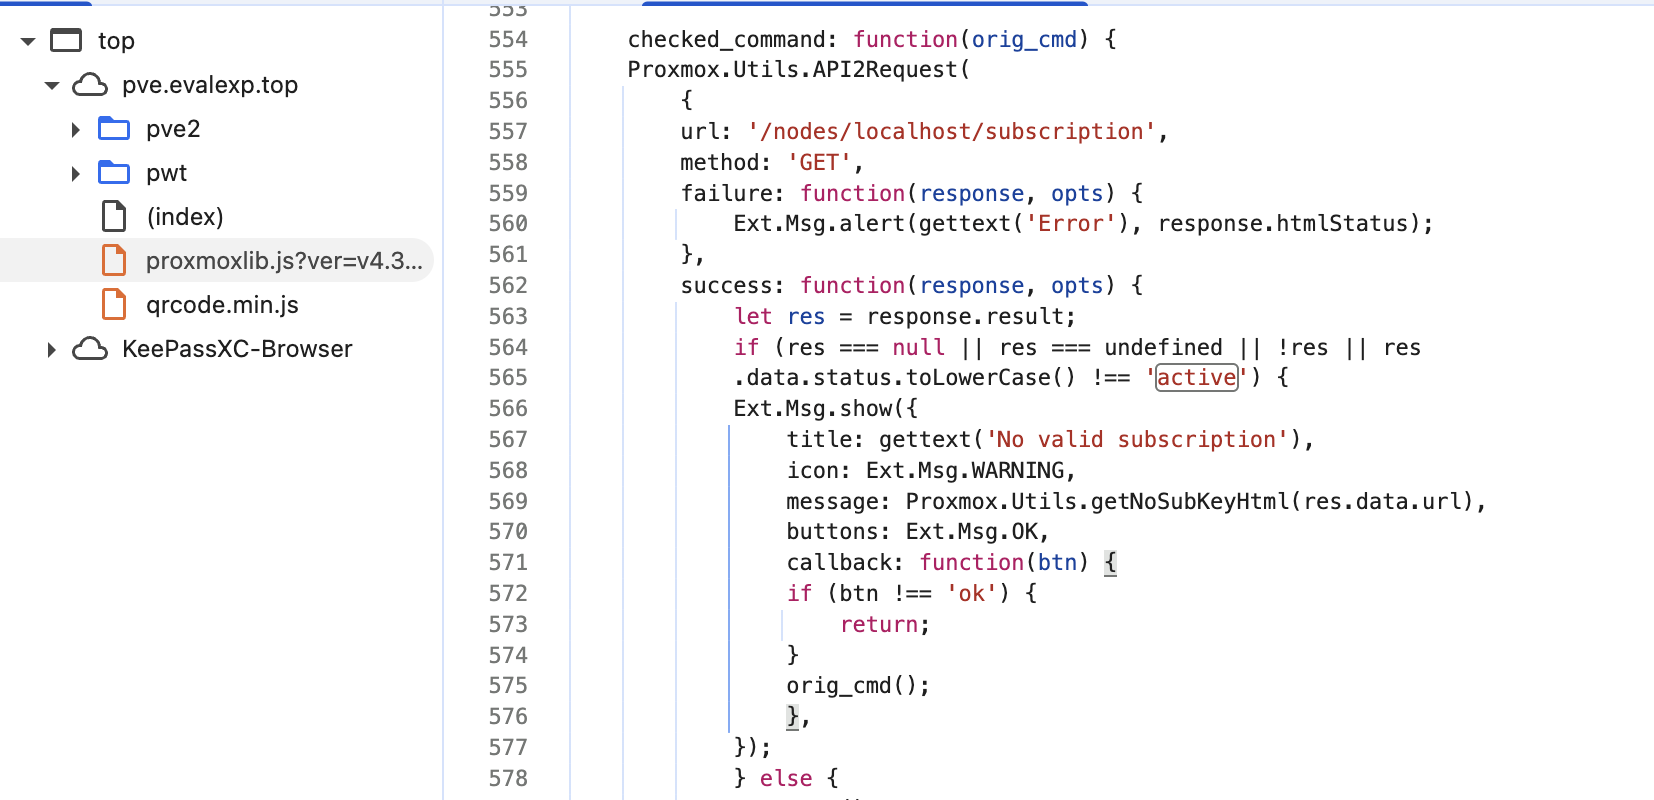
这里可以看到通过判断请求结果的status来判断的;改前端方法是直接改js把这里改成false就好了,这样就跳过了;如果改后端就稍微麻烦点,但是应该比较通用些,这里的api请求实际地址是:api2/extjs/nodes/localhost/subscription;实际在/usr/share/perl5/PVE/API2/Subscription.pm中,大概在200多行,直接搜There is no subscription key就能找到:
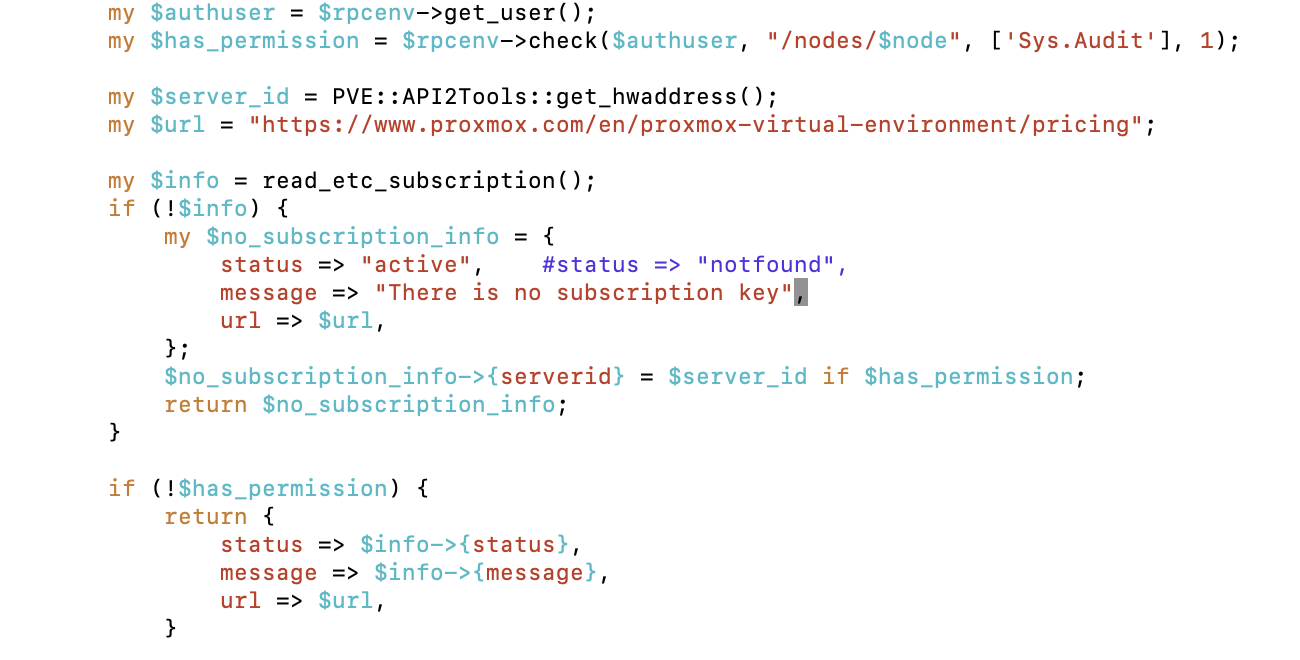
将这里的notfound改为active即可;注意重启pvedaemon和pveproxy两个服务。
显示CPU温度
首先安装lm-sensors,然后检测一下:
apt-get install lm-sensors
sensors-detect
# 一路按Y就可以了,验证
sensors -j
# 若有JSON的输出,显示了CPU温度即可
需要修改两个文件,建议先备份。
/usr/share/perl5/PVE/API2/Nodes.pm/usr/share/pve-manager/js/pvemanagerlib.js首先是第一个文件(/usr/share/perl5/PVE/API2/Nodes.pm):
$res->{ksm} = {
	shared => $meminfo->{memshared},
};

// 添加的是下面这行
$res->{sensinfo} = `sensors -j`;

$res->{swap} = {
	free => $meminfo->{swapfree},
	total => $meminfo->{swaptotal},
	used => $meminfo->{swapused},
};第二个文件(/usr/share/pve-manager/js/pvemanagerlib.js)修改UI显示:
{
	itemId: 'kversion',
	colspan: 2,
	title: gettext('Kernel Version'),
	printBar: false,
	textField: 'kversion',
	value: '',
},
// 从这里往下开始添加
{
	itemId: 'cputemp',
	colspan: 2,
	title: gettext('CPU温度'),
	printBar: false,
	textField: 'sensinfo',
	renderer: function(value) {
		value = JSON.parse(value);
		const c0 = value['coretemp-isa-0000']['Core 0']['temp2_input'].toFixed(1);
		const c1 = value['coretemp-isa-0000']['Core 1']['temp3_input'].toFixed(1);
		const c2 = value['coretemp-isa-0000']['Core 2']['temp4_input'].toFixed(1);
		const c3 = value['coretemp-isa-0000']['Core 3']['temp5_input'].toFixed(1);
		return `Core 0(${c0}℃), Core 1(${c1}℃), Core 2(${c2}℃), Core 3(${c3}℃)`;
	}
},
// 添加到这里结束
 {
	itemId: 'version',
	colspan: 2,
	printBar: false,
	title: gettext('PVE Manager Version'),
	textField: 'pveversion',
	value: '',
},
省电模式
由于使用了桌面级的U,为了节省电费,开启省电模式还是很有必要的。
apt-get install linux-cpupower -y
cpupower -c all frequency-set -g powersave
如果需要调回性能模式:
cpupower -c all frequency-set -g performance查看当前的CPU电源模式:
cat /sys/devices/system/cpu/cpu*/cpufreq/scaling_governor这样其实并没有永久生效,得每次开机使用脚本设置才行。
首先在/etc/目录下创建set-powersave.sh:
#!/bin/bash

cpupower -c all frequency-set -g powersave
注册为systemd服务:
cat > /etc/systemd/system/set-powersave.service << EOF
[Unit]
Description=/etc/set-powersave.sh
ConditionPathExists=/etc/set-powersave.sh
[Service]
Type=forking
ExecStart=/etc/set-powersave.sh start
TimeoutSec=0
StandardOutput=tty

RemainAfterExit=yes
SysVStartPriority=99
[Install]
WantedBy=multi-user.target
EOF
更新一下:
systemctl enable set-powersave.service然后重启PVE,查看一下当前的CPU电源模式是否已经切换为powersave了。
刚重启完成应该还是
performance,等待一会儿即可。
直通SATA控制器
首先开启iommu,修改/etc/default/grub:
GRUB_DEFAULT=0
GRUB_TIMEOUT=5
GRUB_DISTRIBUTOR=`lsb_release -i -s 2> /dev/null || echo Debian`
# GRUB_CMDLINE_LINUX_DEFAULT="quiet"
GRUB_CMDLINE_LINUX_DEFAULT="quiet intel_iommu=on iommu=pt"
GRUB_CMDLINE_LINUX=""
将原先的注释,修改为这样,然后更新grub:
update-grub接着加载对应的内核模块:
echo vfio >> /etc/modules
echo vfio_iommu_type1 >> /etc/modules
echo vfio_pci >> /etc/modules
echo vfio_virqfd >> /etc/modules
update-initramfs -k all -u接着重启,随便在一个虚拟机上添加一下PCI设备就可以看到是否成功,若提示未启用IOMMU则失败。
主板不仅要开启虚拟化,还需要开启
VT-d,这个选项可能在图像设置里。
vgpu核显加速
见文章:
- eq12安装pve8.0,实现all in one,并开启vgpu,简略版 - 哔哩哔哩
- Proxmox VE 8: Windows 11 vGPU (VT-d) Passthrough with Intel Alder Lake 首先克隆源码:
apt-get install git
mkdir repo
cd repo
git clone https://github.com/strongtz/i915-sriov-dkms.git
cd i915-sriov-dkms/修改dkms.conf以适配:
PACKAGE_NAME="i915-sriov-dkms"
PACKAGE_VERSION="6.2"

MAKE[0]="make -j$(nproc) -C ${kernel_source_dir} M=${dkms_tree}/${PACKAGE_NAME}/${PACKAGE_VERSION}/build KVER=${kernelver}"
CLEAN="make -j$(nproc) -C ${kernel_source_dir} M=${dkms_tree}/${PACKAGE_NAME}/${PACKAGE_VERSION}/build KVER=${kernelver} clean"

BUILT_MODULE_NAME[0]="i915"
DEST_MODULE_LOCATION[0]=/kernel/drivers/gpu/drm/i915

AUTOINSTALL=yes
主要是前两行修改了就行。
改6.2是因为当前的Linux内核是6.2的,后面也必须安装6.2的才行,否则无法使用。
然后移动源码并且下载构建工具:
cd ..
mv i915-sriov-dkms/ /usr/src/i915-sriov-dkms-6.2
apt update && apt install pve-headers-$(uname -r)
apt install git dkms build-* unzip -y
安装DKMS:
dkms install --force -m i915-sriov-dkms -v 6.2
dkms status
安装成功会输出:
 接下来更新grub,修改
/etc/default/grub:
# If you change this file, run 'update-grub' afterwards to update
# /boot/grub/grub.cfg.
# For full documentation of the options in this file, see:
#   info -f grub -n 'Simple configuration'

GRUB_DEFAULT=0
GRUB_TIMEOUT=5
GRUB_DISTRIBUTOR=`lsb_release -i -s 2> /dev/null || echo Debian`
# GRUB_CMDLINE_LINUX_DEFAULT="quiet"
GRUB_CMDLINE_LINUX_DEFAULT="quiet intel_iommu=on iommu=pt i915.enable_guc=3 i915.max_vfs=7"
GRUB_CMDLINE_LINUX=""

# If your computer has multiple operating systems installed, then you
# probably want to run os-prober. However, if your computer is a host
# for guest OSes installed via LVM or raw disk devices, running
# os-prober can cause damage to those guest OSes as it mounts
# filesystems to look for things.
#GRUB_DISABLE_OS_PROBER=false

# Uncomment to enable BadRAM filtering, modify to suit your needs
# This works with Linux (no patch required) and with any kernel that obtains
# the memory map information from GRUB (GNU Mach, kernel of FreeBSD ...)
#GRUB_BADRAM="0x01234567,0xfefefefe,0x89abcdef,0xefefefef"

# Uncomment to disable graphical terminal
#GRUB_TERMINAL=console

# The resolution used on graphical terminal
# note that you can use only modes which your graphic card supports via VBE
# you can see them in real GRUB with the command `vbeinfo'
#GRUB_GFXMODE=640x480

# Uncomment if you don't want GRUB to pass "root=UUID=xxx" parameter to Linux
#GRUB_DISABLE_LINUX_UUID=true

# Uncomment to disable generation of recovery mode menu entries
#GRUB_DISABLE_RECOVERY="true"

# Uncomment to get a beep at grub start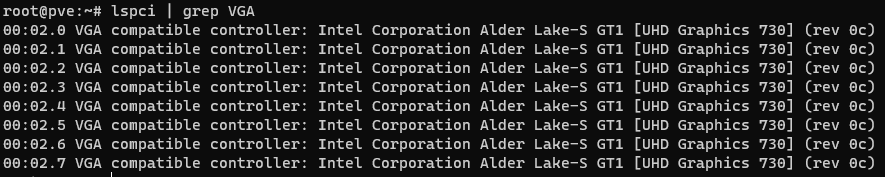
#GRUB_INIT_TUNE="480 440 1"和直通SATA控制器一样,将GRUB_CMDLINE_LINUX_DEFAULT添加一点东西就行,接下来查询一下对应的PCIe总线编号:
lspci | grep VGA应该得到这样的一串字符:
 因此这里实际总线编号就是
00:02.0,接下来将这个编码写入到/etc/sysfs.conf:
echo "devices/pci0000:00/0000:00:02.0/sriov_numvfs = 7" > /etc/sysfs.conf只修改后面的编号,前面的0保留
完成后现在重启电脑,查看一下:
dmesg | grep i915
lspci | grep VGA
成功:
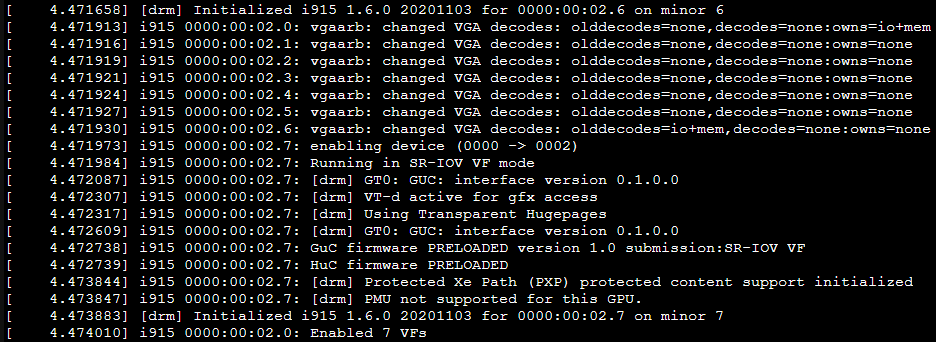
但是好像由于开启了VFIO的原因,导致在Win10中安装核显驱动异常。 实测难以成功,最后还是关闭了核显虚拟化,转而使用核显直通LXC给到
Debian Server进行媒体服务器的假设。
核显驱动
根据文章1. Installation — Intel® software for general purpose GPU capabilities documentation来,首先安装必要的东西
sudo apt update
sudo apt install -y gpg-agent wget
添加存储库:
wget -qO - https://repositories.intel.com/gpu/intel-graphics.key | \
  sudo gpg --dearmor --output /usr/share/keyrings/intel-graphics.gpg
echo "deb [arch=amd64 signed-by=/usr/share/keyrings/intel-graphics.gpg] https://repositories.intel.com/gpu/ubuntu jammy/production/2328 unified" | \
  sudo tee /etc/apt/sources.list.d/intel-gpu-jammy.list
sudo apt update
接下来安装相关软件:
sudo apt install -y pve-headers-$(uname -r) flex bison intel-fw-gpu xpu-smi
sudo apt install -y \
intel-opencl-icd intel-level-zero-gpu level-zero \
intel-media-va-driver-non-free libmfx1 libmfxgen1 libvpl2 \
libegl-mesa0 libegl1-mesa libegl1-mesa-dev libgbm1 libgl1-mesa-dev libgl1-mesa-dri \
libglapi-mesa libgles2-mesa-dev libglx-mesa0 libigdgmm12 libxatracker2 mesa-va-drivers \
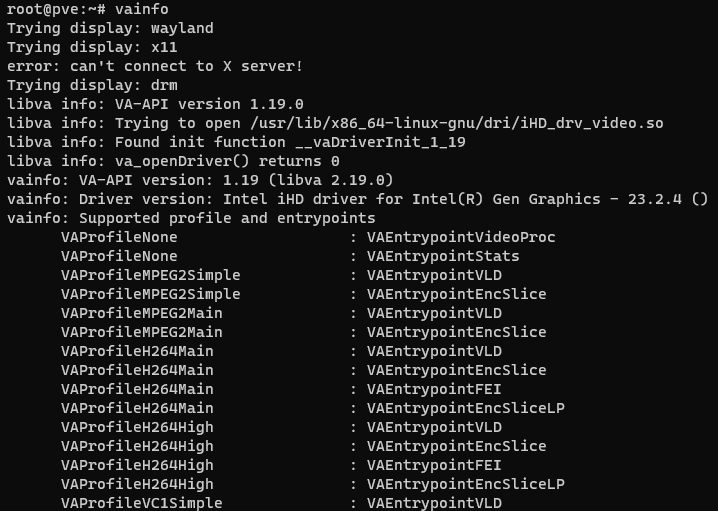
mesa-vdpau-drivers mesa-vulkan-drivers va-driver-all vainfo hwinfo clinfo注意这里和文章中不一样,需要将
headers改为PVE的
此时成功调用核显:
LXC核显直通
使用Ubuntu的模板创建,注意取消非特权容器,创建完成后修改相关配置文件/etc/pve/lxc/102.conf:
arch: amd64
cores: 2
hostname: Ubuntu-Server
memory: 2048
nameserver: 223.5.5.5
net0: name=eth0,bridge=vmbr0,firewall=1,gw=192.168.5.1,hwaddr=D2:9A:A9:F5:A2:D4,ip=192.168.5.5/24,type=veth
ostype: ubuntu
rootfs: local-lvm:vm-102-disk-0,size=20G
swap: 0
lxc.cgroup2.devices.allow: c 226:0 rwm
lxc.cgroup2.devices.allow: c 226:128 rwm
lxc.mount.entry: /dev/dri/card0 dev/dri/card0 none bind,optional,create=file
lxc.mount.entry: /dev/dri/renderD128 dev/dri/renderD128 none bind,optional,create=file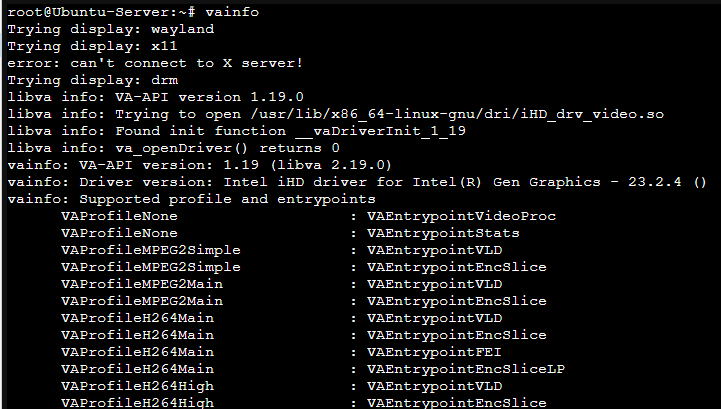
lxc.apparmor.profile: unconfined加的都是下面的lxc.**,直接复制即可,完成后启动Ubuntu的LXC容器,按照核显驱动安装,可以去除pve-headers-$(uname -r)的安装;完成后重启查看一下:
IPV6
开启IPV6的方式如下,向/etc/sysctl.conf追加配置:
net.ipv6.conf.all.accept_ra=2
net.ipv6.conf.default.accept_ra=2
net.ipv6.conf.vmbr0.accept_ra=2
net.ipv6.conf.all.autoconf=1
net.ipv6.conf.default.autoconf=1
net.ipv6.conf.vmbr0.autoconf=1
然后重启即可(命令重载会失败,最好是重启)。